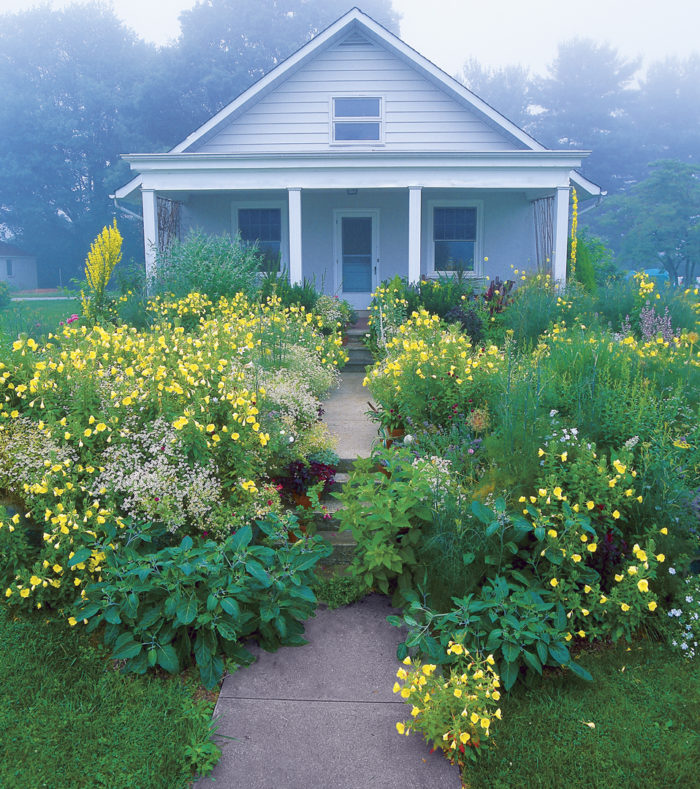
Believe it or not, though I’ve earned my living as a gardener and horticulturist for most of my adult life, it wasn’t until a few years ago that I began to plan the first garden I could call my own. My gardens had always been shared with my parents or clients. This time around, though, I had the chance to transform the forlorn front lawn of a quaint bungalow I’d just moved into.
I decided on a relaxed style for my new garden to reflect the bungalow’s informality. It would also allow me to grow a variety of plants cheek-by-jowl—designing fantastic combinations and reveling in those resulting from sheer luck.
I knew it would take years for perennials to mature, so I filled in gaps with annuals and scattered the seed of self-sowing plants. It’s these self-sowers that have transformed my yard into a lush, ever-changing kaleidoscope of flowers, foliage, and garden drama.
Self-sowers may be annuals, biennials, or short-lived perennials. The trait they share is an eagerness to procreate in the garden without coddling or hassle on the part of the gardener. Their seeds germinate readily from one season to the next. I always sow them directly into garden soil, whether I’m introducing a new plant or replenishing an old favorite. From there, Mother Nature takes over, and the seeds sprout and grow when garden conditions are right for them.
Annuals, and some of the perennials, bloom the first year. The biennials grow foliage the first year and bloom the next spring. So, in the relatively short time frame of two years, these plants fill beds with attractive foliage and beautiful flowers. I’ve come to rely on them as workhorses of the garden; self-sowers are at the heart of my garden’s design.
Unity through repetition
Self-sowers provide strength in numbers—many seeds germinate and quickly develop into masses of bloom. Their repetitive appearance in beds unifies the garden and ties color schemes together. For example, big-flowered evening primroses (Oenothera glazioviana) undulate through my beds in waves, providing cohesiveness with their buttery-yellow flowers and strong, upright form. Likewise, billowing masses of tiny snow daisies (Tanacetum niveum) punctuate the beds at regular intervals, their cool-white flowers and sage-green foliage a wonderful contrast to larger, color-saturated blooms.
Some self-sowers have terrific foliage. One of my favorites, red orache (Atriplex hortensis var. rubra), has tiny seedlings emerging in early spring in a deep purple color. As the vigorous plants grow, the foliage color softens to reddish purple. Then by midsummer, at a height of 5 feet, this wonderful plant adds a vertical accent. Its insignificant flowers mature into beautiful seed stalks by autumn. I like to leave some for winter interest; the birds like them, too.
With self-sowers, seedlings spring up where you least expect them. Not only do they fill gaps in borders, they also provide fantastic plant combinations. One self-sower that blooms early in my garden, bronze-leaved corydalis (Corydalis ophiocarpa), appeared last spring amid dusky, dark-purple ‘Queen of Night’ tulips. Its soft, maroon-tinged, yellow flowers contrasted wonderfully with the tulips. A patch of bronze fennel (Foeniculum vulgare ‘Purpureum’) also grew nearby; its purple-hued foliage provided a rich backdrop for the velvety tulip blooms.
Other self-sowers give exclamation points to the garden. In its second year, biennial clary sage (Salvia sclarea var. turkestanica) sends up stately spikes with lovely pinkish-white flowers. Similarly, spiny plume thistle (Cirsium spinosissimum) emerges from a tight, variegated rosette into bold stalks topped with spiny, purple blossoms. Both add drama and excitement to beds.
Sow seeds directly in the garden
I acquire the seeds of self-sowers from a variety of sources. I order some from gardening catalogs or from organizations like The Hardy Plant Society. I’ve also been lucky to have generous gardening friends who give me seeds. One of the great things about these plants is they usually produce more seed than one gardener could possibly want. If you time your visit well to a garden of self-sowers, its owner may gladly send you off with small packets of seed to grow in your own garden.
I like to spread seeds quite early in the year—late February to early March in my Pennsylvania (USDA Hardiness Zone 6) garden. I simply sprinkle the seeds in the area where I want to establish plants. This early sowing ensures a chilling period for seeds requiring a cool spell for germination. It’s a good idea to stick a label in the soil to mark the spot, especially if the plant is new to you and your garden. After a while, you’ll recognize the seedlings of your self-sowers as quickly as you recognize the seedlings of common weeds in your yard.
Once the seeds are sprinkled, I stand back and let Mother Nature take over. The seeds find their way into little niches in the earth, and rain washes them into contact with the soil. Although there are some plants I have to fuss over, these self-sowers are not among them. A completely relaxed approach has always worked for me with self-sowers.
Don’t worry about seedlings appearing too early. The seeds will germinate when conditions are right for their growth. Young self-sowers are a hardy lot, and freezing temperatures won’t harm them. Those seeds requiring warmer conditions to germinate will lie on the ground until the soil and air are suitable for them. Plants that germinate early get a jump on the season, growing and thriving in the cool weather and ample moisture of early spring. As the weeks slide into the spring season, temperatures moderate and the sun intensifies, and you’ll notice the profound growth rate of these robust, young plants.
Thin seedlings to give them growing room


Emotionally, thinning may be one of the hardest things you do in the garden, but you must remove some of your seedlings for those remaining to flourish. I like to think of this as creative “editing” in the garden. I get around to my first thinning of self-sowers in late April to early May—about the time late-season tulips are blooming. First I remove those seedlings that have come up in or near the crowns of perennials. Be warned: You may be tearing out seedlings by the handful. But, chin up, it’s all for he best. Toss the unwanted seedlings on the compost pile, or pot some up to give away. With care, you can transplant seedlings just before rainfall to fill in gaps; some self-sowers, however, resent transplanting (see dazzling self-sowers panel, below).
I like to allow about 6 to 8 inches of open space around plants. This way, the self-sowers have the breathing room they need, and the spacing also ensures that existing young perennials won’t be smothered by fast-growing neighbors. The self-sowers that remain will thrive and grow rapidly.
Three weeks later, it’s time for the second thinning. This may be even more painful than the first thinning because now you must pull out perfectly well-grown plants. My goal is to allow each self-sower the space to develop into a full-grown specimen. With this thinning I may remove seedlings I missed the first time around, or decide one plant or another needs additional space to reach its full potential. In the end, it’s better to help one plant thrive than leave three or four to struggle and compete for limited resources.
A sampler of dazzling self-sowers


ANNUALS
Red orache (Atriplex hortensis var. rubra)
Grown for its marvelous, deep-wine-colored foliage, this leafy plant provides a tremendous foil for many other flowers and leaves. Early to appear in spring, the seedlings quickly mature to reach 4 to 5 feet by midsummer. Keep some seed stalks for late summer interest. Does not transplant well.
Thorow-wax (Bupleurum rotundifolium)
Often mistaken for a euphorbia, this parsley-family member has chartreuse flowers set among light-green bracts. Plants grow 18 to 30 inches tall and provide color for several weeks in June and July. A good cut flower, its lively blooms combine well with all other colors. Very young plants transplant well.
Bachelor’s buttons (Centaurea cyanus)
This self-sower may germinate in late fall. Overwintered plants will bloom early; those that germinate in early spring will bloom through summer. Colors come in shades of blue, pink, white, and deep maroon. Deadheading prolongs the bloom period. Great for cutting. Seedlings transplant well.
Opium poppy (Papaver somniferum)
From late-winter-germinated seeds, plants grow rapidly to 3 or 4 feet. Foliage is glaucous, gray-green in color. Pendant flower buds open to large, frilly flowers in June and July. Colors include red, pink, white, deep purple, lavender, or salmon in single, semi-double, or double-flower forms. Seed pods are excellent for drying. Cold temperatures enhance germination. Does not transplant well.


BIENNIALS
Spiny plume thistle (Cirsium spinosissimum)
Extremely spiny, variegated leaves form rosettes the first season. The second year, plants shoot upward, producing reddish-purple flowers in spiky heads atop white, woolly, 2-foot stems. After flowering, seed heads burst into fluffy clusters which attract finches. Do not grow in areas where people could step barefoot onto plants. Does not transplant well.
Bronze-leaved corydalis (Corydalis ophiocarpa)
Pale yellow flowers appear in spikes in early spring, a delicate accompaniment to the olive-green, fern-like foliage which rises to 12 inches. Plants bloom longer in shady conditions. Associates well with spring bulbs. Seedlings transplant well.
Rose campion (Lychnis coronaria)
Rosettes of fuzzy, gray leaves expand in their second spring to 2 feet tall. Stems are topped by intense magenta, pale-pink, or cool-white five-petaled flowers from June through July. Deadheading will prolong flowering, but plants eventually die. Seeds require cold treatment for germination. Seedlings transplant well.
Big-flowered evening primrose (Oenothera glazioviana)
Flat rosettes shoot skyward in their second spring, reaching 3 to 4 feet by July. Sweetly scented, clear yellow flowers top stems. At nightfall, they burst into bloom in front of your very eyes like time-lapse photography, attracting moths, friends, and neighbors. Seed stalks are attractive in winter. Seedlings transplant well.
Clary sage (Salvia sclarea var. turkestanica)
In the first year, large, furrowed leaves form a rosette. In the second year, plants grow to 4 feet. Strong, square stems support small flowers held in big, white-flushed, pink bracts from June through July. Leaves and stems are sticky to the touch. Mixes well with taller perennials. Seedlings transplant well.
PERENNIALS
Bronze fennel (Foeniculum vulgare ‘Purpureum’)
Ferny, smoky-maroon foliage emerges in early spring. Wonderful accompaniment to tulips and alliums. Plants eventually reach 5 to 6 feet in height, with stems topped by golden yellow flowers in mid-summer. If plants are cut back hard when 3 feet tall, height can be controlled and flowering delayed until late summer. This plant self-sows prolifically, so allow only a couple of stalks to ripen seed. Seedlings transplant well.
Snow daisy (Tanacetum niveum)
Sage-green, finely cut, fernlike leaves expand in spring to 1-foot-wide clumps. Hundreds of white daisies form a cloudlike effect over the foliage. Combines well with many perennials. Wonderful underplanting for lilies. Seedlings transplant well.
A good organic mulch helps self-sowers thrive
It’s common practice to apply mulch to beds in early spring as perennials are emerging. But in a garden filled with self-sowers, you’ll need to modify your mulching methods. Spreading mulch in early spring is likely to smother tiny, emerging seedlings. So, I wait until after my second thinning to put down mulch. This is also about the time I add frost-tender annuals to the garden.
Any organic mulch such as shredded leaves, compost, or finely ground bark will work. Your goal is not only to protect the garden from weeds and summer dry spells, but also to ensure a friable, porous soil surface upon which seeds will fall at the end of the season. That’s why it’s important to mulch with an organic material that will decompose over the course of the season. Never use heavy bark chips or black plastic in a garden of self-sowers.
I spread the mulch to a depth of 1 to 2 inches, erring on the thin side rather than spreading it too thick. It takes a bit more finesse to deliver mulch around all your seedlings, and a little more time as well. Rather than pouring mulch around plants by the bagful, or tossing it on beds by the shovelful, you’ll need to spread your mulch around self-sowers by the handful. It’s a slower process, but well worth the effort.
Leave some seed heads to self-sow


As the season comes to an end, don’t rush to remove all the spent plants. In a garden of self-sowers, it’s vital to leave some in place, allowing seeds to mature and fully ripen to provide plants for the subsequent year. If you want to keep plants in approximately the same area they’re presently growing, simply knock the ripe seed heads about before pulling out spent stalks. This will scatter the seed in a random pattern, much as nature would if stalks were left standing through the winter. Rain will work the seeds into a secure niche in the ground.
It’s a good idea to collect and save some extra seed at this time. Keep an eye on your plants as seedpods mature and ripen, so you’ll catch the seed at the right time, hopefully before the pods burst and the seeds scatter. Give some to friends, and set aside a packet for yourself in case one of your favorites doesn’t return in spring.
Remember that, once they’re established, what self-sowers do best is return on their own each year. They are likely to spring up in new places from season to season, with the help of birds, the wind, and the rain. This only adds to their charm, as plant combinations happen unintentionally rather than by our own plotting. Every time I pass through my crowded walkway, I marvel at the lavish growth and the bounty of blooms, all from a handful of seed.
Fine Gardening Recommended Products

Harper Super Steel 700-lb. Platform Hand Truck

Corona E-Grip Trowel

Corona® Multi-Purpose Metal Mini Garden Shovel


Comments
Log in or create an account to post a comment.
Sign up Log in