

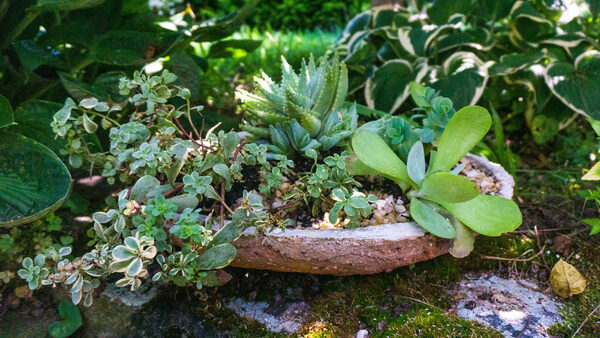
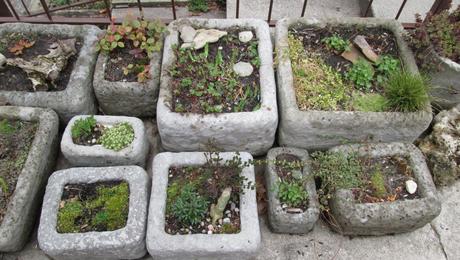
Alpine strawberries and herbs find a home in concrete planters, which harken back to the days when stone troughs held water for farm animals.
To make a hypertufa trough, you’ll need peat moss, perlite, and Portland cement. Make sure you buy straight Portland cement. You don’t want any of the pre-mixed concrete or mortar you’ll find on the market.
You’ll also need a few ounces of synthetic concrete reinforcing fibers, which strengthen the planters. You can find the fibers at most masonry-supply stores or online.
For mixing the ingredients you’ll need a wheelbarrow or any large plastic container. You’ll need a sieve or screen to sift the peat moss to remove sticks and lumps. And you’ll need a stiff wire brush to remove rough edges. Wear rubber gloves while mixing and handling the mixture because Portland cement will irritate your skin. A small dust mask helps keep perlite dust from irritating your nose and lungs.

Photo/Illustration: Michelle Gervais
Further reading: Create a hypertufa container in five easy steps.
This project can be a bit messy, so pick your work area with that in mind. Part of making a planter is letting it cure for 12 to 24 hours until the cement and other ingredients harden. Bright, hot sun can cause uneven curing, and might make the planter crack or fracture, so pick a shady spot to make your planters.
You’ll want a sturdy, flat surface. I like working at a picnic table. I cover the table with heavy plastic sheeting, which I tape to keep it from sliding around.
Finding the best mold for the job


A planter’s shape is limited only by your ingenuity and whatever potential molds you have on hand. Don’t use wooden or metal molds unless you first line them with plastic, otherwise the mixture will stick to the molds and you will damage the planters when you try to remove them. The mix won’t stick to cardboard, plastic, or Styrofoam molds.
To make a rectangular planter, I use two nesting cardboard cartons as molds. The larger box functions as the outside form and the smaller box is placed inside. This creates a space of 1 in. to 2 in. between the two boxes into which the mixture can be packed and tamped down. A larger trough will require thicker walls to maintain strength and, therefore, more space between the two boxes.
Molds can also be made from the polystyrene foam used for house insulation. The pieces are held together with wooden cooking skewers. You can get this kind of foam at building-supply stores.
For a more free-form look, you can press the mixture over a plastic-bag-draped earthenware or wooden plant container. Another alternative is to make a mound of soil or sand and then cover the mound with a plastic bag.
Proportions for a proper mix

Measurements for the ingredients are not exact. Rough proportions are helpful, but ultimately you will develop a feel for how wet the mix should be. What you’re after is a mixture that’s about the consistency of cottage cheese.
Here are the rough proportions for the mix by volume: two parts Portland cement, three parts sifted peat, three parts perlite. You’ll need much less of the reinforcing fibers, about a handful.
Here’s another way of looking at it. To make an 18 x 12 x 9-in. planter, you need approximately 2 gallons of sifted peat, 2 gallons of perlite, 1-1/3 gallons of Portland cement (about 12 lb.), 1 cup of loosely packed reinforcing fibers, and water.

Measure the peat moss, perlite, Portland cement, and reinforcing fibers into a wheel barrow or other large container. Using gloved hands, mix the dry ingredients.
Add water slowly, mixing with your hands until the material is the desired consistency. Grab a handful of the mixture, and squeeze it; it should hold together and only a few drops of water should emerge. The total amount of water needed will depend on the dryness of the peat moss and the humidity in the air.
The mixture shouldn’t be runny — too much water and you’ll get a weak container. A free-form container needs a drier mixture so that it will hold its shape.
Wondering what to plant in your new container? Browse our plant guide or check out more articles on container gardening.
Just like making mud pies


Every time I make another one of these planters, I feel like a child making mud pies. It’s fun!
When I use the two-box method, I put a 1-in. to 2-in. layer of the mix on the bottom of the larger box. Then I center the smaller box inside the larger and pack the mix firmly between the sides of the two boxes. When the sides reach the desired height, I smooth and level the top edge.
If I’m molding a planter over an overturned flower pot or a mound of soil, I begin by packing a 1-in. to 2-in. thick layer of the mix around the bottom of my mold. Then I work upward, adding more material until I reach the top. I pat the mixture smooth and keep the top as flat and even as possible. This will be the bottom of the pot when it is turned over.
Planters require two stages of curing
Curing refers to the drying of the material and to the chemical bonding that takes place. Curing has two stages: an early stage when the planter should not be moved, and a longer drying period following removal of the mold. The initial curing period takes 14 to 36 hours, while the latter takes about three weeks.
For the first 36 hours, cover your planter with plastic. The plastic makes it cure more slowly, and slower curing produces a strong planter.
After a day and a half, I test the hardness of the mixture with my fingernail. If I can scratch the surface, the mixture is still too soft and should be left for a few more hours and then retested. When it requires a screwdriver to scratch the surface, the planter is ready for the second stage of curing.

I carefully remove the mold from the planter, and then smooth the corners and rough edges with a stiff wire brush. You can texturize the planter by scoring it with the brush. Be careful not to press too hard, as the walls are still friable. Leave the planter in a shady spot for about three weeks to finish curing.
After three weeks, the planter will be a lighter color and will weigh less. The last step is to leach out the strong alkali or free lime contained in the Portland cement. A heavy concentration of lime is harmful to plants. I leach away the lime by filling the porous planter with water.
Over the next ten days, I refill the planter whenever it’s empty. If you live where it rains a lot, nature will do the leaching for you. I like to make planters during the winter and leave them to leach until spring.
Finishing touches

The planters are naturally porous, but if you want additional drainage, drill a hole in the bottom using a masonry bit.
I’ve made dozens of these planters, and have used them for herbs—thyme, chives, sage, chervil, and mounding basil—and vegetables, too. Round carrots, baby beets, radishes, tiny Mei Qing Choi, and alpine strawberries adapt beautifully to these pots.
Fine Gardening Recommended Products

The Crevice Garden: How to make the perfect home for plants from rocky places
Fine Gardening receives a commission for items purchased through links on this site, including Amazon Associates and other affiliate advertising programs.

Nesco Snackmaster Express Food Dehydrator
Fine Gardening receives a commission for items purchased through links on this site, including Amazon Associates and other affiliate advertising programs.

SHOWA Atlas 370B Nitrile Palm Coating Gloves, Black, Medium (Pack of 12 Pairs)
Fine Gardening receives a commission for items purchased through links on this site, including Amazon Associates and other affiliate advertising programs.


Comments
Great! I used a butter knife to get a realist stone affect whilst the hypertufa mix was partially set. I recreated chisel marks with the knife and now it looks just like real stone. Take a look at the finished peice: http://www.theallotmentgarden.co.uk/the-pondering-gardener/make-hypertufa-stone-trough-1592/
or make the drainage holes part of the mold
Log in or create an account to post a comment.
Sign up Log in