
I’ve always liked building garden structures, but my business usually keeps me elbow deep in the restoration of Colonial and Victorian houses. So when a client with a big idea and a tiny budget wanted me to create an eye-catching arbor for her yard, I jumped at the chance. I think an arbor makes an artful addition to any garden. Its tracery lends sculptural elegance to stark, wintry landscapes, and when covered by flowering vines in summer, an arbor becomes an enticing bower—a place to linger and visit with a friend, or to rest in cooling shade. We ended up building the arbor around a fence and gate, but the simple, rustic design I came up with will fit into many settings. By making it a little larger, you could transform the arbor into a small pergola that would look great placed at the end of a walkway. Put a bench inside, cover the arbor with wisteria, and you’ve got a cozy sitting spot. If you wanted to add the arbor to a child’s play area, you could outfit it with a swing.
You should be able to do everything in a single weekend. All it takes are basic carpentry skills, a few pieces of standard lumber, and a toolbox equipped with the basics. The most sophisticated power tool you’ll need is a circular saw.
The materials are readily available

To keep the project affordable, I used inexpensive pine and Douglas fir for everything except the vertical pieces that will be partially buried in the ground. For these, I used pressure-treated wood that lasts for years before it begins to rot. As an alternative, you could waterproof the upright parts with a preservative. For a more attractive look, you could build the arbor of cedar or redwood. Cedar construction boosts the cost for materials a bit; redwood would be even more expensive. You should be able to get the rest of the materials—carriage bolts, nuts, and washers, as well as some sand and gravel—at a local lumberyard. To help prevent moisture damage to the finished arbor, use galvanized nails; they won’t rust and stain the wood. You can finish the arbor with paint or stain if you wish, but I think it looks good and requires less maintenance if simply left to weather.
Whichever type of wood you use, plan on spending the better part of a day building the arbor, and figure on another half day to dig the holes and put the structure into place. You’ll need a toolbox equipped with a circular saw, an electric or cordless drill and a 3/8-inch bit that can drill a hole at least 7 inches deep, a spade or post-hole digger, a combination square, a tape measure, a chisel, a hammer, a carpenter’s level, and a wrench.
Build the top of the arbor first
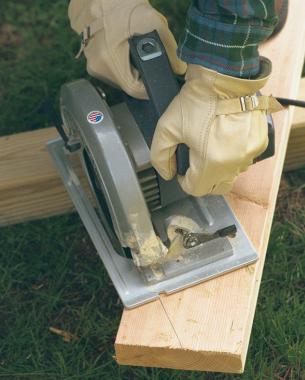
Start the project by cutting the cross braces, the two pieces that span the top of the arbor. The first step is cutting the lower corners off two 6-foot 2×6 boards as shown. This is just a decorative touch, so to refine the design, you could make more intricate, curved cuts. You can speed the process by marking and making the first cut, then using the scrap piece as a template for marking the other cuts.
Once the ends have been trimmed, clamp the two cross braces together, and place them bottom side up to mark the position for each of the four notches that get cut in each board. Each pair of notches should be the width of a 2×4 apart. To get the precise distance, lay a piece of 2×4, wide side down, across the cross brace. Use a combination square to get a good right angle.


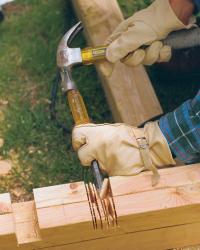
After marking the notches, set the circular saw to cut 1½ inches deep, and cut each side of the notch first. Then make repeated passes between the two outer cuts, cutting away a little more of the wood each time. Use a chisel to clear any remaining wood from the notches.
T-shaped supports provide a solid foundation
To make the T-shaped supports that provide the arbor’s strength, secure a pair of 2x6s to the top of each of the 4×4 support posts. In the finished assembly, the support braces are parallel to each other and perfectly aligned.
Start by making decorative cuts, like those at the end of the cross brace, on what will be the lower corners of the four 4-foot 2×6 support braces. Use one of the pieces left over from the cross braces to mark the corners for cutting. Look for knots or unsightly imperfections in the wood—this is the time to decide which side of the wood should show on the outside of the arbor.
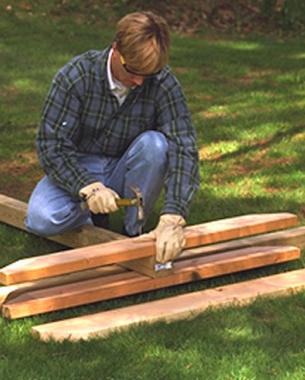
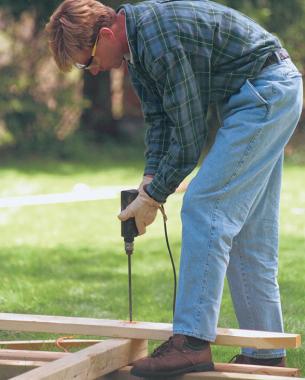
Once the support braces are cut, attach them to the 4×4 support posts. To do this, lay one of the support posts on its side, and put one of the support braces across the post centered and flush to the top. Use two 10d galvanized nails to tack the brace in place. Carefully turn the assembly over, and fasten a second 2×6 so that it aligns with the one you just fastened. Tack the second piece in place. Carefully drill two 3/8-inch holes through the 2x6s and the 4×4 post. Avoid drilling into the tacking nails. Then tap the carriage bolts through the holes and secure with a washer and nut.
Getting a lattice-like look on the sides

Now you’re ready to complete the lattice-like sides of the arbor. Slip an 8-foot 2×4 between the support braces on each side of the 4×4 post. Position these side rails so they are parallel to the 4×4 post and 12 inches away from it. Fasten at the top with 10d nails. Run a tape measure down the 4×4, and place the first ladder rail 12 inches from the support brace; the second should be positioned 24 inches down, the third 42 inches down, and the fourth 60 inches down. Then center the 1×2 ladder rails on the 4×4 (they should extend about 3/4 inch beyond the side rails on each side). Fasten them with a 6d galvanized nail or two at each end and in the middle.

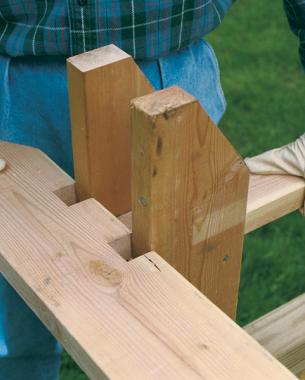
When they are in place, nail on a stabilizing, 4-foot length of 2×4 about 6 inches above the bottom of the 2×4 side rails. Since these 2x4s are there to help support the arbor when you raise it into place, don’t drive the 10d nails in all the way because you may want to remove the stabilizers once the arbor has been erected. But if you plan to build a swing in the arbor, leave the stabilizers; they’ll add needed support. Once you’re finished, assemble the second side of the arbor in the same way.
Lay the two sides on the ground, and position the notched cross braces on them. Before you raise the arbor, check to make sure all the pieces fit together easily. You may have to trim the notches a little if the fit is too tight. It’s a lot easier to make these little modifications on the ground than once the arbor is upright.
Raise the arbor into place
To get the arbor in its final position, you’ll need to dig six holes: two for the uprights and four to take the bottom of the side rails. For the support posts, dig two holes 36 inches deep and 48 inches apart on center. In other words, the distance from the center of one hole to the center of the other should be 4 feet. Pick a level patch of ground; not only will the arbor look odd if perched on a slope, it will be that much more difficult to position it properly. Once the holes are dug, place about 6 inches of gravel into the bottom of each. Then, on either side of the main holes, dig two small, 6-inch-deep holes to receive the bottoms of the side rails.
When you’re ready to actually raise the arbor into place, an assistant might prove useful. Slide the support post of one side of the arbor into the deep center hole so that the stabilizer board rests on the ground. About 7½ feet of the upright should be aboveground. Use a level to make sure the post is plumb and the support braces level. Then fill the hole with sand, packing it as you go. The post may shift a little as you fill in the hole, so check it a few times. It’s easier to make minor adjustments as you go than it is to pull the whole assembly out of the ground and start over.
Slide the second side of the assembly into the other predug holes. Add some sand and gravel, but do not pack it.
An arbor builder’s shopping list
To build an arbor 7½ feet tall and 6 feet wide (outside edge to outside edge), you’ll need the following materials. To build a wider arbor that is more like a pergola, buy longer pieces for the cross braces.
Lumber
2 Support posts*, 10 ft. long, 4×4 in size
2 Top cross braces, 6 ft. long, 2×6 in size
4 Arbor support braces, 4 ft. long, 2×6 in size
4 Side rails, 8 ft. long, 2×4 in size
8 Ladder rails, 32 in. long, 34 in. x 12 in. in size
2 Stabilizers, 4 ft. long, 2×4 in size (optional)
*Note: Pine is acceptable for all wood except support posts and side rails, which should be cedar, redwood, or pressure-treated.
Hardware and miscellaneous
8 Carriage bolts, 8 in. long, 3/8 in. in size
8 Washers, 3/8 in. in size
4 Nuts, 3/8 in. in size
1 lb. 6d galvanized common nails for securing ladder rails to the arbor
1 lb. 10d galvanized common nails for fastening cross braces, side rails, and stabilizer bars and for positioning support braces
Approx. 100 lb. each of sand and gravel
Make the structure plumb and level
Standing on a ladder, cap the arbor with the two cross braces. Unless you’re very lucky, very skillful, or both, the arbor is going to require some adjusting before it’s all plumbed up and leveled. Use the secured side of the arbor as a fixed reference, and adjust the second side forward or back, left or right, or up or down, whatever is required to make the posts plumb and the cross braces and support braces level. When everything is lined up, fill the second hole with sand and gravel, packing it as you go. Check the structure with a level again. If it’s true, nail the notched cross brace into position with 10d nails. If you want, you can remove the 2×4 leveler boards at the bottom of each side.
More garden projects
Fine Gardening Recommended Products
Okatsune 103 Bypass Pruners General Purpose Medium
Fine Gardening receives a commission for items purchased through links on this site, including Amazon Associates and other affiliate advertising programs.
Ho-Mi Digger - Korean Triangle Blade
Fine Gardening receives a commission for items purchased through links on this site, including Amazon Associates and other affiliate advertising programs.

Planting in a Post-Wild World: Designing Plant Communities for Resilient Landscapes
Fine Gardening receives a commission for items purchased through links on this site, including Amazon Associates and other affiliate advertising programs.


Comments
Many thanks for taking the trouble to post this, Joe. I used your plans as a basis for my arbor, primarily to support a wisteria which had been wrapped around an old deck which we demolished. This explains the concrete post which we could not remove without disturbing the wisteria roots, s we incorporated it as a support. I increased the dimensions for my arbor as it is access to back of the property for a vehicle, and the design still worked well.
Just wanted to share with you a photo of the arbor my new hubby and I built for our wedding ceremony based on this article. The instructions were super-simple to follow, and we easily modified them a little to suit our needs of a movable, free-standing structure. Many thanks for posting this DIY, it made our wedding yesterday even more special!!
Nice article, well written! Love the photo of the arbor with the Sweet Autumn Clematis!
Log in or create an account to post a comment.
Sign up Log in