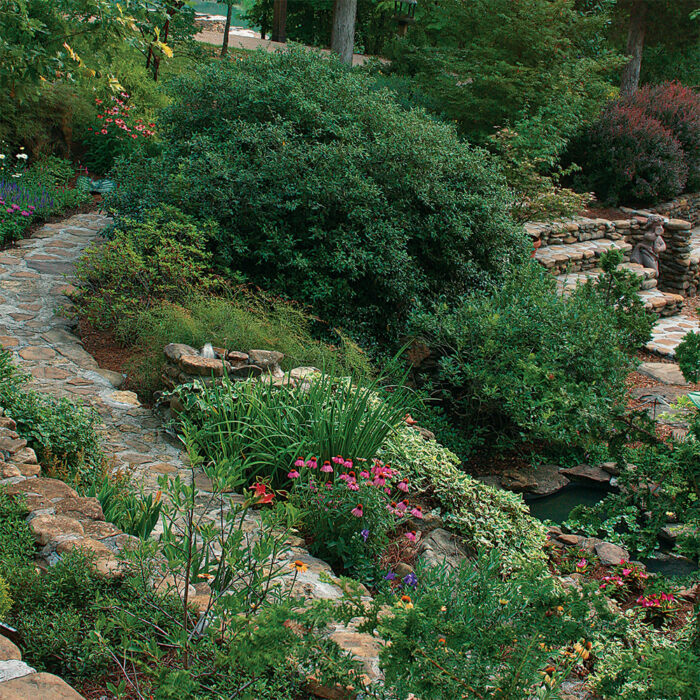
Whether you have a small hill or a giant incline, a slope of any size is a tremendous design challenge. The usual solution is to install classic step terracing. My husband, Tom, and I found this approach to be too limiting because the garden looks good when viewed from only a few specific areas. We wanted more from our hillside, so we designed a garden that could be enjoyed from almost any vantage point. Instead of terracing in the usual linear fashion, we laid out a series of curved terraces. This approach allows visitors to get a great view of the garden—no matter where they are standing.
Carve out circular terraces for more vantage points

For our slope, we formed three semicircular levels—defined by three terraces. The curved terraces, much like the curved lines of beds, allow the eye to naturally wander when viewing the garden. They also enabled us to build generous pathways between the levels, which provide multiple viewing spots. At the top of the slope, which is the back of the garden, we built a rock wall. We made sure to make the height of the uppermost terrace at least 6 inches taller than the crest of the hill so that runoff from downpours goes around the garden and does not wash through it. In front of the wall is a wide planting area and then a stone pathway, which separates the garden bed from the middle terrace.
To define and build the middle section, my husband used large, interesting boulders dug out from around our property. The large rocks created a wall, of sorts, and they became ledges and spillways for waterfalls that would become the focal point of the garden. Because our slope is so big, we wanted to ensure that there was an extra level of interest, and a large-scale water feature was the perfect solution. Another garden section and pathway lies between the curved middle terrace and a low bottom wall. One last garden bed—and a path that goes almost all the way around it—lies in front of the bottom wall. This bed, and the pathway that encompasses it, is almost a complete circle.
Provide better access with radial steps

One disadvantage to traditional terracing is that there is usually just one stairway through the center of the garden, and it doesn’t allow access to any other part of the beds. We wanted people to experience our sloped garden from not only the center but also other spots, so we built a series of stone steps that bisect the garden in a radial fashion.
The steps allow access to the pathways between the terraces. Placing them at angles toward either end of the slope encourages people to wander around the garden, not just walk straight through it. In other words, the steps direct the garden traffic in a way that allows visitors to see more of the garden. One set of steps connects the pathways from the lower to the middle level, then another set of steps meanders to the top for a spectacular view of the entire garden. The steps on either side of the curved terraces enable people to experience everything that the middle of the garden has to offer.
Creating a garden you can get into

There’s no argument that you almost always need terraces to garden on a slope, but curved terraces are ideal for showing off a garden. The curved design and the radial steps that connect the different levels allow greater access to the inner areas of the landscape than regular terraces and, therefore, provide countless spots to experience the garden; plus, the space appears different from every location. Linear step terraces limit the garden viewing to just three areas: top, center, and bottom.
Fill in each ring with plants of varied heights

As each of the rings was completed, I couldn’t wait to add soil and plants that were suited to that area. Although conditions were important when it came to the choice of plants, their height was just as crucial. Unlike traditional terracing, each level of a curved terrace should have tall, medium-size, and short plants. This approach makes the garden more interesting when viewing it from within. If you planted only tall plants in the outer ring, medium-size plants in the middle, and short plants at the bottom level, the garden would seem one-dimensional when viewed from one of the inner pathways. This does not, however, mean that you can plant towering trees at the back of the innermost ring. You need to keep scale in mind when making plant selections.


I filled the back of the outermost bed, for example, with large shrubs, like fernspray false cypress (Chamaecyparis obtusa ‘Filicoides’, USDA Hardiness Zones 4–8). Then within the same bed, I underplanted medium-size perennials, like Big Sky™ Sunrise coneflower (Echinacea ‘Sunrise’, Zones 4–9), before planting a series of shorter perennials closest to the path. In the middle ring, I started with a slightly smaller set of shrubs, such as ‘Conoy’ viburnum (Viburnum × burkwoodii ‘Conoy’, Zones 5–8), at the back of the bed and then stepped down to gradually smaller perennials from there. When walking along the uppermost pathway, you can still see the viburnums in the middle bed, but because you’re experiencing them from above, they seem smaller and more in scale.
From the bottom of the slope, all the plants still appear to descend gradually in height, but you also get that same feeling from standing in the middle of one of the pathways. The one exception to this planting plan is the bottom bed. Because it is almost completely round and you can walk around nearly the entire perimeter, I planted the tallest plants at dead center and then surrounded them with gradually smaller plants.
Although we incorporated water features and giant boulders into our garden, a curved-terrace design would look terrific without them. If you just follow the general design principles we used, you will be amazed with how that once-troublesome slope is now your favorite spot in the landscape.
Fine Gardening Recommended Products

SHOWA Atlas 370B Nitrile Palm Coating Gloves, Black, Medium (Pack of 12 Pairs)
Fine Gardening receives a commission for items purchased through links on this site, including Amazon Associates and other affiliate advertising programs.
A.M. Leonard Deluxe Soil Knife & Leather Sheath Combo
Fine Gardening receives a commission for items purchased through links on this site, including Amazon Associates and other affiliate advertising programs.
The Crevice Garden: How to make the perfect home for plants from rocky places
Fine Gardening receives a commission for items purchased through links on this site, including Amazon Associates and other affiliate advertising programs.





Comments
I have had the great pleasure of visiting this garden in person several years ago. The owners were kind enough to participate in an open garden day and share their beautiful property with the public.The terracing and pathway approach is truly very conducive to enjoying all the plantings. I loved it and left feeling very inspired!
The great front yard with the old boat http://nicepatio.com/inexpensive-landscaping-idea/
Log in or create an account to post a comment.
Sign up Log in