How to Grow Beets
Beets come in a range of colors, and their flavors are always sweet and rich
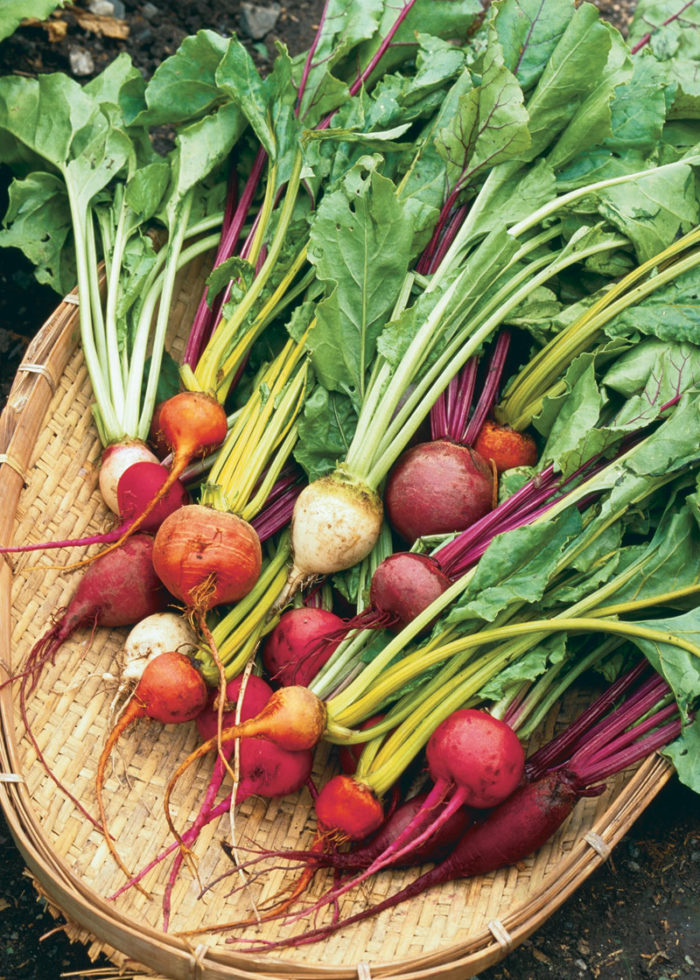
I suppose beets might be appreciated more if they hung from trees like apples instead of spending their lives in the soil. Glistening in the sunlight in colors ranging from magenta to gold to white, they might then be described as sweet and bright and airy. As it is, dwelling underground, and showing up in many of our memories as canned red balls or corrugated slices from a jar, they’ve developed an undeserved reputation as earthy and dull. Perhaps it’s time to bring the many virtues of beets into the light.
Beets can be easy and satisfying to grow if you prepare the soil well, fertilize carefully, sow the seed lavishly, and thin them conscientiously. Beetroots vary in color and shape from the small, globular, radish-colored ‘Chioggia’ to the lumpy, white, industrial-strength sugar beet. Their flesh can be the prototypical blood-red, golden, white, or red-and-white ringed. All of them are sweet and all can play colorful roles in the kitchen. Some beets are grown only for their nutritious and tender leaves. The larger leaves can be cooked like chard or spinach, the smaller ones served raw in salads. The varied and versatile beet is well worth a spot in any garden.
Beet basics
- Prepare a seed bed by working in compost and fertilizer. Smooth with a rake, then make shallow indentations 3 in. apart.
- Plant beets every three or four weeks from spring into fall, sowing two seeds per space because beets have a relatively low germination rate.
- Beet seeds are conglomerates—clusters of multiple seeds. After they germinate, pull out all but one seedling.
- For fresh eating, harvest when roots are about 2 in. across. A light harvest of leaves during growth won’t diminish the size of the roots.
Cultural clues from the past
Whenever I’m getting to know a vegetable, I like to find out where it came from. Even the most civilized of vegetables, such as corn, carries with it genetic reminders of its wild, adaptive past. Beets are no exception. Wild beets, leafy and without large roots, can be found growing on the seacoasts of Western Europe and the Mediterranean. In that environment they have adapted to regular moisture, moderate temperatures, loose soils, and salt. They tolerate a rather high pH. Some of the best beets I’ve grown were on the west side of California’s Central Valley where the sandy soil’s pH hovered around 8. That area also produces large quantities of sugar beets. Italian sugar beets thrive in the drained salt marshes of the Adriatic Sea. If you give beets what their ancestors needed, you have a good chance of success.
Red balls and beyond
I grow beets of many shapes and colors, and I harvest them at various stages, depending on how they’ll be used.
Beets for fresh eating. I grow a few standard red beets, but I prefer to grow three varieties that don’t bleed when you cut them. These are useful when you want beet flavor and texture without turning everything red. One is an ivory-colored variety called ‘Albina Verduna’. It’s very sweet, almost like a sugar beet. The ‘Golden’ beet has a flavor less sweet but fuller than ‘Albina Verduna’. ‘Golden’ cooks up a deep orange-red.
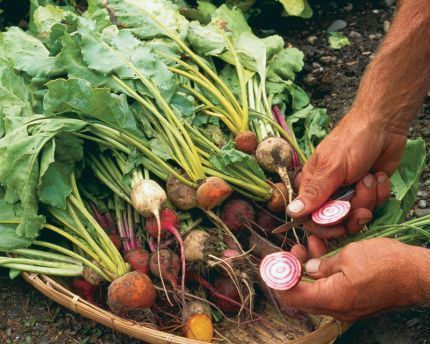
My favorite, and the favorite of the kids who visit the garden, is ‘Chioggia’, named after a city on Italy’s Adriatic coast. The skin is bright magenta, like a radish. When you slice it crosswise you see alternating rings of red and white. I’ve heard it called the target beet, and if you grate it you get candy stripes. When it’s cooked, the rings fade into one another and take on the color of a sunset. I also occasionally grow long, cylindrical red beets called ‘Cylindra’ or ‘Formanova’. You can use them to get uniform slices.
It’s easy to see why ‘Chioggia’ (pronounced key-O-jha) is sometimes called the target beet. Neither ‘Chioggia’ nor the golden beet, lower left, bleeds its color during cooking.
I sow a succession of each of these varieties every few weeks beginning in the spring and ending in the fall, making sure they are adequately watered during the warm days of summer. You can harvest these beets at any size. I usually harvest about 60 days after seeding by poking around in the soil and pulling those that are 2 in. or larger in diameter.
Beets for keeping into winter. Although each of the varieties above seems to make it through our California winters without a problem, none of them grows very large. I often sow a few overwintering beets in midsummer and let them size up during the fall. When cold weather comes, they can be left in the ground, heavily mulched, or lifted. With the leaves twisted off, they’ll keep a long time in the refrigerator. My favorite is a dual-purpose beet called ‘Lutz Green Leaf’ or ‘Winterkeeper’. Its root is deep red, 4 in. to 5 in. across, and keeps very well.
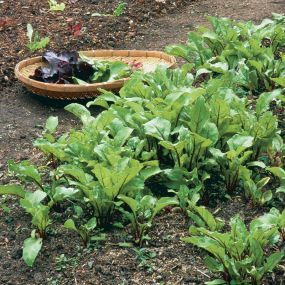
Leaf beets. Although the leaves of all beets are fine to eat, there are a few varieties I grow especially for their unique foliage. ‘Lutz Green Leaf’ beets have, in addition to those large roots, abundant pale green leaves that approach the size of chard. ‘Bull’s Blood’ has dark maroon, almost purple, leaves. It looks good in the garden, and you can pick the smaller leaves all season to add color to a salad. Larger leaves are better cooked, more tender and sweeter than chard, though not so tender as spinach. ‘MacGregor’s Favorite’ has elongated, iridescent leaves that vary from dark red to green with red veins. I’ve found that if I only lightly harvest the tops of these leaf beets, I can get some massive roots. From a March seeding I harvested keeper-sized beets in early July. The color, texture, and flavor of these midsummer monsters were all top-notch.
All beets have edible leaves, but ‘Lutz Green Leaf’ and ‘Bull’s Blood’ (the dark ones in the basket) are grown primarily for their foliage.
It’s not hard to grow good beets
I worked a long time to get consistently good beets. Some years I’d get a crop of large, smooth, round ones with lush greens. Other years I’d get a scraggly crop of babies that refused to grow up. I eventually realized those that didn’t grow well had been struggling with soil depleted by a preceding heavy-feeding crop like broccoli. I’d been starving them, treating them more like carrots than beets. Along with friable soil that will allow them to grow uniformly, beets need plenty of nitrogen. I now feed them well, adding fertilizer in an amount somewhere between that needed for carrots and that needed for leafy vegetables.
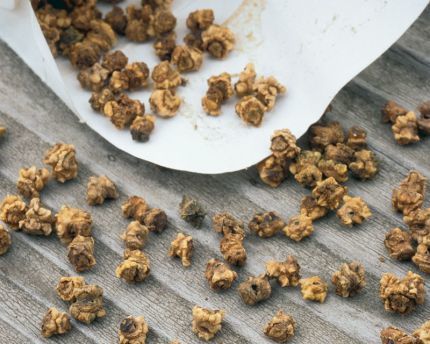
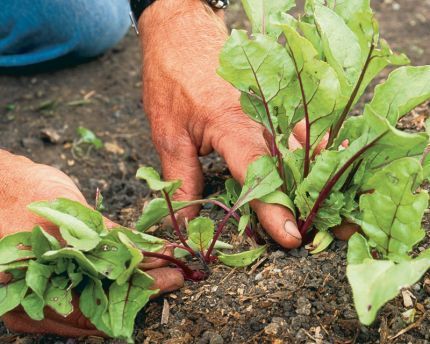
Beet seeds look weird because they’re actually several seeds fused together. That’s why thinning isn’t optional.
I use wide beds to make the best use of limited space. I work the bed, add plenty of well-composted horse manure to loosen the soil and about 3 lb. of seed meal (7% N) per 100 sq. ft., and then rake the bed smooth. Sometimes, if I’m in a desperate hurry or my back is tired, I broadcast the seed, chop it in with a rake, and sift compost over the surface. Thinning becomes a bit more tedious this way, and the spacing is uneven, but it is quick. I prefer, however, to dent the surface with my fingers every 3 in. in an offset pattern. I drop a couple of seeds in each shallow depression (more for ‘Golden’ beets, which don’t germinate well), cover them, and sift compost over all. Then I water the bed with a fan spray and keep it moist until the seedlings emerge, in about a week.
For nicely shaped roots, you must pull out all but one plant from every “seed,” holding onto the beet you’re leaving behind to keep it from being dislodged, too.
Beets are biennial, running to seed in their second season if not harvested. The corky-looking beet seed you plant is actually a cluster of up to six individual seeds. This means that after the seedlings emerge you’ll have to thin them down to one if you want well-developed beets. If you wait to thin until the leaves are several inches long, you can use the thinnings, some with immature beets attached, in the kitchen. Leave the most vigorous-looking plant in each group and pull the rest. Water after thinning to firm the loosened soil. Don’t try to transplant the thinnings unless you’re growing them for the leaves only; transplanted beetroots end up rough, gnarly, and twisted. Keep the soil moist but not saturated.
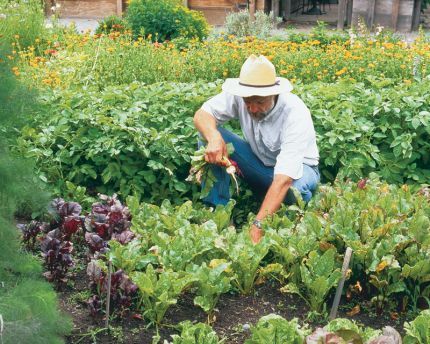
By the time the roots have reached 2 in. across, the beets have developed plenty of flavor and sweetness and are ready to harvest. At right, the author is gathering a white Italian variety called ‘Albina Verduna’.
I find a great deal of pleasure in growing beets. I like the rugged texture of the seeds; they look battered and scarred and toughened by their stormy coastal origins. I like the prepared seed bed smooth, evenly dimpled, and ready for seeding. Above all I like to harvest a few beets of each variety and take them to the faucet to wash off the soil. As the colors appear under the running water, they look like jewels to me and at that moment, with my hands full of nothing more than humble beets, I feel rich beyond measure.
Sources for beet seeds
The following catalogs list a wide selection of beets.
The Cooks Garden
PO Box C5030
Warminster, PA 18974
800-457-9703
www.cooksgarden.com
Ornamental Edibles
5723 Trowbridge Way
San Jose, CA 95138
408-528-7333
www.ornamentaledibles.com
Pinetree Garden Seeds
PO Box 300
New Gloucester, ME 04260
207-926-3400
www.superseeds.com
Territorial Seed Company
PO Box 158
Cottage Grove, OR 97424
800-626-0866
www.territorialseed.com
Fine Gardening Recommended Products
Berry & Bird Rabbiting Spade, Trenching Shovel
Fine Gardening receives a commission for items purchased through links on this site, including Amazon Associates and other affiliate advertising programs.
Razor-Back Potato/Refuse Hook
Fine Gardening receives a commission for items purchased through links on this site, including Amazon Associates and other affiliate advertising programs.
Gardener's Log Book from NYBG
Fine Gardening receives a commission for items purchased through links on this site, including Amazon Associates and other affiliate advertising programs.



Comments
Log in or create an account to post a comment.
Sign up Log in