
I had my first water garden when I was six. It was just a birdbath that spilled into a pool, but it began my lifelong fascination with water gardening. Since then, wherever I’ve lived, I’ve had a water garden. So many things about water gardens intrigue me: the plants, the fish, the wildlife they attract, and the constant tinkering you can do.
If you are considering installing a water garden, you probably have some basic questions. The information that follows should give you the background and vocabulary you need to take your project to the next step.
The essential elements of a water garden
The water from the header pool will flow down the waterfall and across the main pool to the skimmer. The hose will return the water from the skimmer to the header pool. Once the stone shelf is completed, the liner can be installed.
Site
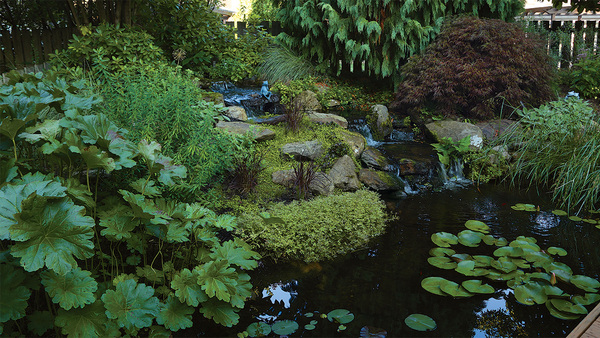
Put your pond where you will enjoy it. Put it next to your deck if you spend a lot of time there, or perhaps place it outside your favorite window. Keep in mind, though, that most water plants require full sun to do their best. One place not to put a pond is in the lowest point in the yard, as this can cause some serious drainage problems.
Shape
A shape that’s too intricate will not only make it more difficult to lay out your liner but will also create dead areas from which water can’t move to the filter. Initially, an oval may seem too simple, but your plantings will give the pond a free-form effect. Use a garden hose, extension cord, or rope to outline the shape on the ground.
Structure
A water garden should be more than a hole in the ground filled with water. To make the best possible water garden, I recommend including a stone shelf, a plant shelf, and a header pond.
The stone shelf is a ledge around the rim of the main pool that serves as a level surface for the rocks that hold the liner in place and also hide its edges. It also provides a natural transition from the landscape to the pond. This shelf should be slightly narrower than the stones you are using. I recommend making the shelf 8 inches deep, extending 4 inches above the water line and 4 inches below.
The plant shelf is another ledge; this one rings the pool below the stone shelf. I recommend that it be 1 foot below the water line and 18 to 24 inches wide. I like to construct an underwater planter on this ledge by lining it with stone, filling it with 6 to 9 inches of heavy clay soil and topping it with a layer of sand and gravel. An easier route is to put the plants in the water still in their pots. Keep the shelf the same width to allow for an artful arrangement of plants rather than a lineup.
The header pool is a small area where water accumulates after being recirculated by the pump and before spilling over the waterfall. It should be no larger than a third the surface area of the main pond to avoid serious drops in the water level when the pump is turned on. The header pool gives the water a more natural flow as it spills down the waterfall.
Digging
Before you stick a shovel in the ground, call the local utilities to make sure you’re not about to dig into any underground water, gas, or phone lines. Then, to visualize the pond, dig out the edge all around to a depth of 2 to 4 inches.
The first section to be completely dug out is the center of the pond. If you dig out the shelves first, you can’t get your wheelbarrow close enough to where you’re digging. I locate the middle section by measuring to where the inside edge of the plant shelf should be, then outlining it with string and 8-penny nails pounded into the ground. You can also use spray paint, lime, or flour. After digging out the center, dig out the plant shelf and the stone shelf. While you’re digging, keep checking to be sure sure the edges are reasonably level. If they aren’t close to level, your liner is sure to show.
Equipment
The two most expensive pieces of equipment are the pump and the skimmer box. Skimmers range from $99 to $1,200, while most pumps are around $200. The size you need depends on the square footage of your pond and the number of gallons it holds. The skimmer box and pump will come with instructions for installation, but be sure to place the skimmer box at the opposite end of the pond from the waterfall to ensure that all the water in the pond passes through the skimmer box.A water garden with a waterfall requires electricity, a skimmer box, a pump, and a hose to direct water back to the header pond. The electricity needed for a pond is standard household current. For safety, you should check with town officials about your local codes regarding outdoor electricity near water.

It’s best to install the skimmer box and the plumbing while you are digging out the pond, preferably while you are building up the soil on the slope for the waterfall. That way, you can lay out the hose, stake it in place, and bury it as you go. I run the hose from the skimmer box to the bottom of the header pond and attach a regular household shower drain, which eliminates the hose-between-the-rocks effect and provides a good place for beneficial bacteria to grow.
Liner
A liner fitted in the hole will never be wrinkle-free, but the folds will be barely noticeable when the pond is finished. Foliage, flowers, stones, and water all serve to draw the eye away from such details. My advice is to aim for as few folds as possible and not worry about them. Don’t cut the top edge of the liner. Hide it by folding it back under the top layer of stones or by burying it well above the water line.The first step in lining a pond is to put in underlayment, a thick feltlike material that prevents stones or anything else with sharp edges from puncturing the liner. Materials like sand, newspaper, and old carpet are often recommended for this purpose, but I prefer underlayment because it stays put, lasts, and is easy to use. At about 45 cents a square foot, it’s cheap, saves time, and protects your pond from leaks. The underlayment must lie flat, so be sure to cut out all the folds. You can lay it in pieces if need be. Remove stray stones or anything on top of the underlayment that might puncture the liner.

Maintenance
Your skimmer box is crucial to the filtration of your pond, but it’s only half the story. In addition to this mechanical filtration, you need biological filtration in the form of beneficial bacteria. Bacteria feed on the harmful ammonia, nitrites, and nitrates in the water and break down larger waste so it can be used by the plants in the water.
You must provide a place—a mesh bag filled with lava rock, for instance—for the bacteria to colonize. Put this bag in the header pool over the outflow from the pump. The bacteria will perform best if it has the cleanest, most oxygenated water possible.
A water garden can provide you with a lifetime of enjoyment. It can add a new dimension to your landscape and offer you a whole new palette of plants to grow. And no matter how hard you try, you can’t overwater your plants.
Greg Speichert is publisher of the magazine Water Gardening and owner of Crystal Palace Perennials in St. John, Indiana.
Photos, except where noted: Steve Aitken
Fine Gardening Recommended Products
A.M. Leonard Deluxe Soil Knife & Leather Sheath Combo
Fine Gardening receives a commission for items purchased through links on this site, including Amazon Associates and other affiliate advertising programs.
Harper Super Steel 700-lb. Platform Hand Truck
Fine Gardening receives a commission for items purchased through links on this site, including Amazon Associates and other affiliate advertising programs.





Comments
Bacteria feed on the harmful ammonia, nitrites, and nitrates in the water and break https://testmyspeed.onl/ down larger waste so it can be used by the plants in the water.
Bacteria feed on the harmful ammonia, nitrites, and nitrates in the water and break https://testmyspeed.tel/ down larger waste so it can be used by the plants in the water.
Log in or create an account to post a comment.
Sign up Log in