When it comes to hydrangeas, I’m certifiably loony. Or, at least, I used to be. The source of my obsession was a variegated hydrangea. I bought it in full flower, and the azure, lacecap blooms were simply stunning against the backdrop of broad, spade-shaped leaves edged with creamy white. Then winter hit and it died to the ground. New shoots burst forth in spring, adorned with luscious foliage, but no blooms appeared. Ditto the next spring. And the next. Apparently the plant was root-hardy here, but its stems and flower buds—which form on year-old growth—were not. In my USDA Hardiness Zone 6 Connecticut garden, Old Man Winter prevailed.
But it got me thinking that if I kept my variegated hydrangea (Hydrangea macrophylla ‘Tricolor’) warmer, its stems and buds might survive. So I decided to cover the plant in winter. I bought one of those homely-looking Styrofoam cones sold to protect tea roses in winter, capped the hydrangea, and covered that with a layer of shredded leaf mulch and pine boughs. Then I waited until the next summer when—lo and behold—the hydrangea flowered.
Emboldened by success, I started experimenting with other marginally hardy plants, using everything from small glass domes to homemade, doghouse-sized plastic greenhouses. I soon realized winter cover-ups could provide an extra zone or more of warmth. I’ve used these devices to help late-season transplants get established, protect recently transplanted evergreens, and coddle a few choice perennials that would otherwise never survive winters in my garden. There’s nothing complicated about it. I rarely spend more than 15 minutes prepping a plant for winter, and unveiling it for spring takes even less time. My methods aren’t foolproof. There’s still a casualty or two every season. But even with occasional losses, my efforts are repaid several times over each year.
Protect tender plants with water, mulch, and shelter
Everyone knows that plants die if winter temperatures are too frigid for them to endure. But severe weather can pose a threat even to hardy plants. An early-season burst of bitter cold can shatter the cells of woody plants that haven’t yet hardened off. Later in the season, those same plants could march through a similar cold snap in stride. Deeper into winter, cold, dry winds can draw the life from conifers or broad-leaved evergreens. Even warm spells can be perilous. High temperatures can evaporate the last reserves of moisture from the transpiring leaves of evergreens whose roots, locked in frozen ground, are unable to draw replenishing moisture from the soil.
Most hardy perennials could sleep through winter peacefully if tucked under a thick blanket of snow. But where snowfall is iffy, exposure to Jack Frost’s full force may kill marginally hardy plants. In poorly draining soils, winter wet can rot the crown of hardy perennials. And the churning freeze-thaw cycles of early spring can easily heave plants—roots and all—from the ground. To complicate matters further, the tissues of some plants, particularly trees and shrubs, are more susceptible to cold temperatures in their youth or their first year or two after transplanting. Only when they’ve reached a certain level of maturity are they fully hardy.
My garden is subject to just about every one of those threats. So, to prepare marginally hardy or recently planted perennials, trees, and shrubs for winter, I make sure at-risk plants are deeply watered before the ground freezes. In addition, any recently transplanted or marginally hardy evergreens get a spray of an anti-transpirant, like Wilt-Pruf, to seal the microscopic openings in their leaves. When the ground has frozen, I give new plants—even those rated bone-hardy for my garden—a 2- to 4-inch blanket of mulch, either ground bark or, preferably, shredded leaves. I also use pine boughs or branches cut from the Christmas tree. These make an excellent, airy mulch for young hellebores or any fledgling evergreen perennial because they help moderate temperature changes and offer protection from the winter wind and sun.
Plants in need of special coddling—anything unlikely to survive winter’s cold and wet—should be tucked into a custom, seasonal shelter before cold weather settles in, usually about late November in my garden. It doesn’t have to be elaborate. I’ve used overturned plastic pots, lengths of burlap, shredded leaves, even a heavy-duty paper bag. Unless you make the effort to build an artistic shelter, chances are that an array of protected plants is going to look like a hastily abandoned campground. But I can live with the less-than-good looks for a year or two until a newly planted tree or shrub is well-established. Even so, any plantings that will need long-term coddling shouldn’t be positioned prominently in the stark winter landscape. To avoid aesthetic crises, I tuck my tender treasures at the bottom of a gentle slope in the backyard, where they can’t be seen from the house.
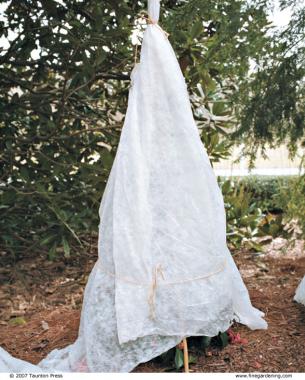
A burlap wrap works well for shrubs or small trees

Photo/Illustration: Lee Anne White
To protect newly planted conifers or broad-leaved evergreens from harsh conditions, a simple windbreak and sunscreen usually suffices. The simplest shelter is a quick cocoon of coarse burlap or floating row cover. I just take a length of material long enough to wrap around the plant a couple times, drape the fabric over one side of the plant, and then wrap it loosely as if I were rolling up a rug, positioning the branches to avoid breakage. If the plant is taller than the width of the material, I work the material up or down the plant with each successive layer. Once the plant is covered, a loop or two of twine holds everything in place.
Still, a heavy, wet snowfall or ice storm could weigh down the fabric enough to topple the whole thing—breaking branches and maybe even snapping the trunk. For a sturdier enclosure, I drive a few tall tomato stakes into the ground around the plant, wrap a curtain of burlap around them, and then staple it into place. For full protection, I make the burlap walls at least 6 inches taller than the plant.
Protect perennials with a simple cover


Windbreaks serve a purpose. But to create a micro-environment that will protect tender hydrangea buds or a perennial rated a zone or so warmer than my garden, I make a more protective enclosure. It can be simple or complicated, depending on the plant.

For most perennials, my goal is to protect the crown of the plant so it will survive to generate new growth in spring. That means covering a relatively small area. I protect a 3-foot-wide-and-tall cardoon (Cynara cardunculus), which I prize for bold, sawtooth-edged swords of silvery foliage, with a 15-inch-wide, bell-shaped glass dome called a cloche. In late fall, I fold the cardoon’s fronds of foliage back over its crown—for extra layers of insulation—then pop the cloche over the resulting wad of leaves. So the plant won’t get too hot when the sun shines, I drape a few pine boughs over most of the cloche. Snug in its glassy igloo, the cardoon slumbers peacefully through the winter. Although the leaves die back, the plant reawakens in spring to grow with a vengeance. You can find glass or plastic cloches at some garden centers or in mail-order catalogs, and there’s also a product called Aqua Dome (www.wingedweeder.com)—a hard-shelled, cloche-like gizmo whose panels are filled with an insulating layer of water. A similar device called Wall-O-Water, which is popular with season-stretching vegetable gardeners, would probably work too.
Build a winter home for larger plants
Protecting larger plants, especially those with woody stems, requires a little more ingenuity. For anything under 15 inches, I carefully bundle the branches together and cap them with a large, overturned, plastic pot covered with leaves or pine boughs to ward off heat on a sunny day. Plants that are larger require a custom approach.

Ever since I saw a Euphorbia characias ssp. wulfenii in the Pacific Northwest, I’ve been smitten. The plant has such noble splendor and looks so incredibly…well, weird, that I just had to grow one. It’s nowhere near hardy here, but I figured a little protection might go a long way. The first winter, my protected plants died, but I attributed that to winter wetness, and amended the soil to improve drainage. The next fall I surrounded a new plant with bubble wrap wound around four stakes and stapled into place. For a roof, I tied stakes to the pillars as rafters and topped it off with a sheet of plastic . The shelter wasn’t airtight, but I didn’t want it to get too hot on a sunny day. I rigged a burlap skirt around the bottom of my assemblage to permit air circulation while keeping out some of the cold and wind. With this annual routine, the plant’s been thriving in my garden.

Photo/Illustration: Lee Anne White
Dean Kelch uses a similar, but more elaborate, technique to protect hundreds of cacti and other succulents at the Ruth Bancroft Garden in Walnut Creek, California. He builds wooden frames and covers them with plastic or floating row cover. The greenhouse-like structures are placed over a plant, then fastened to rebar stakes driven into the ground. Though his frames—some as high as 15 feet tall—take a bit longer to build, they can be reused from year to year. Kelch always leaves a 2- to 3-inch opening at the bottom of the frame to allow air circulation and prevent heat buildup. He gives the plants inside up to a foot or so of clearance. With PVC piping and elbow-shaped connectors, assembling a similar enclosure could be as easy as building with Tinker Toys. Kelch also protects some cacti simply by wrapping them in a layer of plastic secured with twine.
Unwrap plants in spring
As winter melts into spring, I patrol the garden daily to look for signs of new life. The first frilly blooms of witch hazel, the first snowdrop, and the first crocus are all cause for celebration. But I make sure that I don’t let myself get carried away by these early harbingers of spring. I don’t yank the wraps from my protected plants just yet, as more nights with icy temperatures are still likely. Instead, I wait until just before the cheerful trumpets of early daffodils sound their April fanfare to herald spring’s arrival. Ideally, the wraps come off at the start of a stretch of cloudy weather. Cool, gray skies ease the plants’ return to the real world. But as long as the plants are still dormant, a more abrupt reawakening shouldn’t be too shocking. Removing the wraps takes even less time than putting them on, and it’s joyful work, filled with the anticipation of things to come—like the lacecap flowers that will make my variegated hydrangea that much more enchanting.
Fine Gardening Recommended Products

A.M. Leonard Deluxe Soil Knife & Leather Sheath Combo
Fine Gardening receives a commission for items purchased through links on this site, including Amazon Associates and other affiliate advertising programs.

Fine Gardening receives a commission for items purchased through links on this site, including Amazon Associates and other affiliate advertising programs.

Pruning Simplified: A Step-by-Step Guide to 50 Popular Trees and Shrubs
Fine Gardening receives a commission for items purchased through links on this site, including Amazon Associates and other affiliate advertising programs.


Comments
All right! I've been looking for a reason why NOT to use over-turned pots on my semi-5a butterfly bushes, and here you are, helping greatly with your answer.
Thanks so much!
Flowers Forever
Great article, very thorough and helpful! I really appreciate it.
I have very low to the ground shrubs on the side of my driveway where snow removal will cover them with a minimum of 4 feet of heavy snow. I just planted them in the spring so this will be the first winter for them. Could I cover them with apple crates to protect them from the crushing weight of the snow?
Log in or create an account to post a comment.
Sign up Log in