How to Grow Bell Peppers
Sweet peppers offer a summer finale to savor

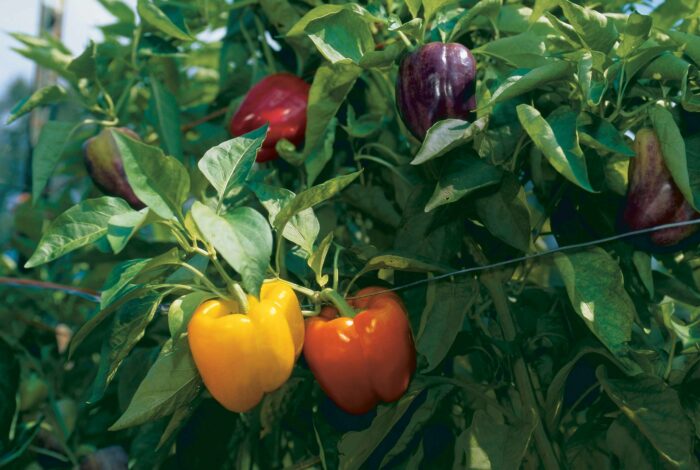
I always seem to have time for the pepper garden, especially toward the end of summer. That’s when the piece of Carolina piedmont we’ve cultivated since the spring starts paying off with a pepper bonanza. For eating and entertainment, our diverse cast of bell peppers can’t be beaten. The rows fill with rainbows as the fruits mature under dark green canopies of foliage. Some are so sweet we eat them like apples.
What we don’t eat fresh we freeze so they’re available all year. Without the color, texture, and flavor of peppers, why cook? We’ve developed a system to grow great plants, allowing us to pick colorful peppers over the entire harvest season, which lasts through much of the fall. The production is well worth the price, which is no more than good planning and the usual TLC.
For a long season, plot before you plant
We set out pepper plants in our Zone 7a garden in early May, and they grow until the first killing frost in late October or early November. They’re in the ground longer than any other annual in the garden. To keep a crop growing strong and weed-free that long requires good planning and attention to the crop’s special needs.
We try to pick a planting site where we have not grown tomatoes, eggplant, or potatoes for at least three years. These plants share many of the same soil and leaf diseases, and it’s best not to give them a chance to build up. Peppers grow best in well-drained loam or sandy loam soil. The heavier the soil, the more organic matter you need to add.
Test the soil for adequate minerals. Any balanced garden soil grows fine peppers. Still, I highly recommend a soil test every few years to ensure adequate mineral nutrients, especially phosphorus (P), which helps roots develop, potassium (K), and calcium (Ca).
Additional potassium and calcium might be needed to spur good fruit development. Potassium and calcium help produce nice thick pepper walls that not only taste better but also resist fruit rot. These nutrients should be added when turning under the remnants of the year’s garden. We always plant a cover crop, such as clover or wheat, which stabilizes our raised beds through the winter. When we turn the cover under in spring, it decomposes and provides most of the nitrogen the peppers need.
Seeds need feed and heat. Eight weeks before transplanting, we start our seeds in a well-drained potting mix and keep them moist and warm (70° to 80°F) to ensure good germination. We use a heating mat under the seedling flats. But any consistently warm place—above the refrigerator, for instance—works. Plants need to be separated in the seed flat by at least 2 in. for best growth. After the first true leaves develop, we start fertilizing with a balanced liquid solution such as a fish emulsion and kelp mixture. Closely watch the cotyledons—the seed leaves that appear before the first true leaves. They should be vibrant and green. Yellow cotyledons, for example, indicate insufficient nitrogen. It’s best to gradually expose transplants to the outdoors for a week or two prior to setting them out.
Make the bed the right way
Three or four weeks before transplanting we turn under our cover crop so it has time to decompose and the soil has a chance to warm in direct sunlight.

Just before planting we again till shallowly to kill any germinated weeds and incorporate nitrogen. Peppers need only about 1 lb. of nitrogen per 500 sq. ft., and a good cover crop usually provides that.
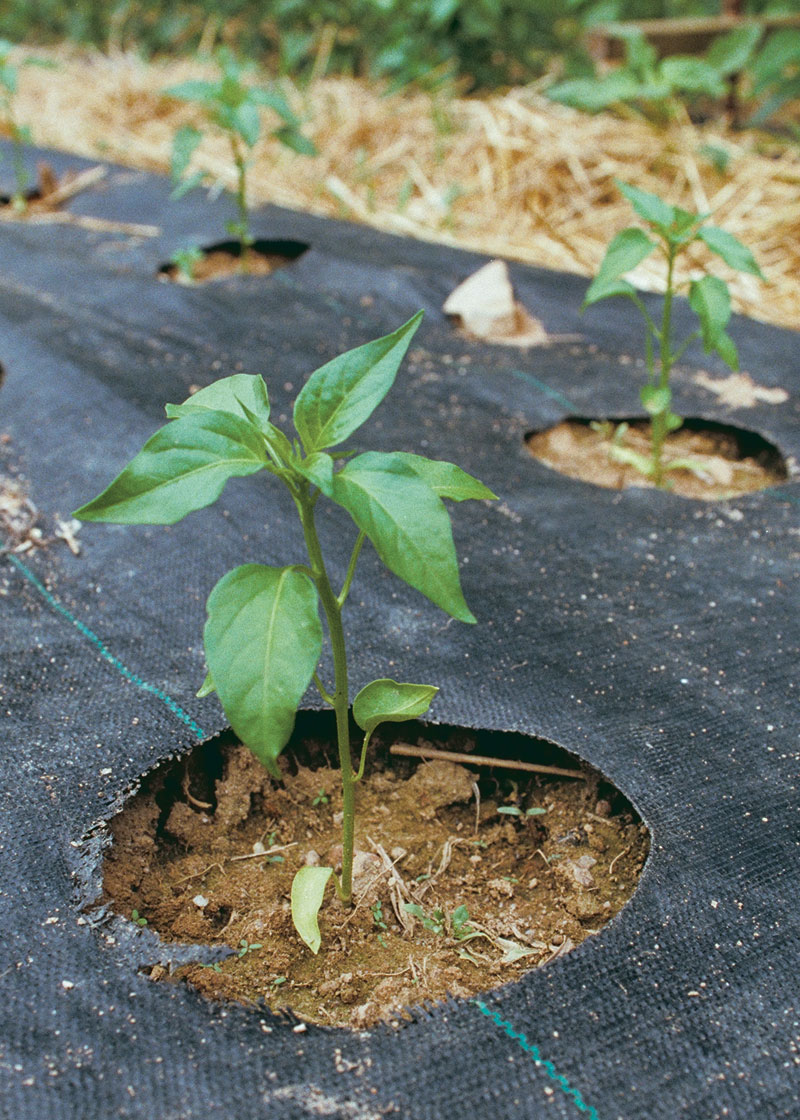
Then we follow with a drip irrigation line down the middle of the bed, and cover the bed with black, woven landscape fabric, pinning the edges down securely to prevent the fabric from blowing up in high winds. We make 4-in. holes in the fabric, and the edges can be melted with a candle so they won’t unravel. We prefer landscape fabric over black plastic because we get all the benefits of plastic, such as smothering weeds and warming the soil, and because it’s permeable, water won’t puddle on top and become another catalyst for disease.
Good rows grow good plants. We plant peppers in two rows per bed, with the rows 12 in. apart and the plants 18 in. apart in the row. This promotes good airflow among the plants for disease control and high production from a small area.
Between the beds, we leave a wide path mulched with straw. This also contributes to good air circulation and provides room for the plants to grow, and ours grow huge. It also eases access for picking. The mulch helps ripen the fruit evenly by reflecting light on the underside of the peppers.
Mulch also keeps the soil cooler and the humidity up a little. While peppers need heat to get going fast and early, they will not set fruit if it’s too hot. Night temperatures over 80°F and daytime temps over 95°F will cause flowers to drop or fail to produce viable pollen. Light-colored mulch in the paths may help overcome this by reflecting out some heat.

Take stock of temperatures for best results. On transplanting day, we hope for clouds, cool temperatures, and no wind. We give the plants a good watering with a fertilizer solution just before we set them out. The weather can’t be too cool, however. Peppers are recalcitrant when it comes to cold temperatures, both in the air and in the soil. When you transplant, you want the plants to keep growing vigorously. Pepper plants sulk in nighttime temperatures below 55°F and soil temperatures below 65°F.
Using a trowel, we set the young plants through the holes in the landscape fabric. Peppers, unlike their tomato cousins, won’t grow more roots from their stems if buried deeply. But they support themselves better if they are planted a bit deeper than in the seedling flat. In hot climates with sandy soils, you can plant them up to the first true leaves, thus putting their roots down into cooler, moister soil. The heavier the soil, the shallower they should be planted to reduce the risk of stem blight that develops in waterlogged ground.
Peppers may need a push across the finish line
We grew just the right-size transplants, prepared the soil perfectly, and made sure they received 1½ in. to 2 in. of water each week. And now, several weeks after transplanting, they are blooming like crazy.
Good crop rotation, use of disease-resistant varieties, raised beds, and good air circulation takes care of 95% of our pest problems. That leaves the major antagonist, caterpillars—both the European corn borer and the corn earworm—which fly in as moths and lay eggs on the peppers. They become a problem in mid-July after they’ve had their fill of everyone’s corn and about the time our peppers appear.
We spray reluctantly and only if the damage goes beyond our tolerance. We use Bacillus thuringiensis (Bt), a bacterium that attacks the worms’ digestive system. Most years, one treatment does the trick. Other than water, the peppers may need only a little nitrogen boost late in the season. Here in the humid South, with plentiful rain and a long season, peppers can begin to run out of gas in mid-to late July.
 |
 |
When the leaves begin to lose that darker green color, we consider feeding them. Because of the landscape fabric mulch, this means a liquid form either sprayed on the leaves or slipped in through the drip irrigation lines under the landscape fabric.
This isn’t much nitrogen—about the amount you would use for seedlings or transplants—but it’s enough to keep the plants growing and fruiting. The more it rains, the more often you may need to feed them, since nitrogen easily leaches out of the soil. With too much nitrogen early on, though, peppers, like tomatoes, just make lots of plants and set no fruit.
Finally, a peck of peppers to pick
Fifty to 60 days after transplanting, we begin picking peppers. The thin-walled ‘Cubanelle’ and purple bells always come the earliest, followed quickly by the first green bells. We pick once a week and plan on at least one or two peppers per plant each week all the way to frost. For the colored sweet bells, we go ahead and pick the first peppers green and low on the plant, since experience has taught us that fruit rot invades if we let them go to color. This early harvest also keeps the plants setting fruit for later harvest. For the first two or three weeks, we pick the “crown set,” the first pepper produced at the first fork in the plant, then move up the plant and thin the fruits so they are not touching and have good airflow around them.
By August 1, we stop picking the immature green peppers and wait for them to turn their vibrant colors. If you let a pepper go to its full color, the texture will be smoother and the sugars will really develop.
By the end of August, the insect pressure decreases, the weather is drier, and the sweet, colored fruit ripens with fewer defects. For almost the next two months, there’s a weekly harvest. The curtain falls with the first hard freeze. Then we start looking forward to the next season when we will again walk through the garden in search of the perfect sweet pepper.
Quilting the pepper patch: Choosing the best varieties to grow
Techniques matter, of course. But the right variety makes all the difference in the world. The problem is that what grows well in my part of the country may not in yours. You must try different varieties, choosing those with the characteristics you want—color, size, disease resistance, fruit that sets continuously or in a concentrated period, etc. And read seed catalogs carefully. Our long, hot, humid growing season means more exposure to all the problems that plague any garden plant. So disease resistance, especially to tobacco mosaic virus and bacterial leaf spot, is high on my list of plant attributes. For a continuous harvest, you need a large plant with lots of foliage that will support and cover lots of peppers. Compact plants just don’t have long enough side stems to support fruit far out on the branches. They also don’t have dense enough foliage for the critical role of screening fruit from scalding sun rays. We test varieties side by side for several seasons, keeping only the best but always testing new ones to make sure there isn’t a better mousetrap out there.
After 10 years, here are the varieties we really like: In green bells, ‘Camelot’ and ‘Galaxy’ produce nice blocky, four-lobed fruit. Green peppers are selected mainly for shape, since they will all turn color when mature. In red bells, we grow ‘Elisa’, elongated, four-lobed fruit with good disease resistance and a continuous fruit set. In yellow, ‘Orobelle’, with its blocky, thick-walled, four-lobed fruit, is tough to beat. It even makes a good general green bell if picked early. In orange, the sweetest of all, ‘Valencia’, takes the prize. Generally, I don’t believe in purple food. But for the kids and for bright, fresh salads, ‘Islander’ is a beautiful lavender fruit.
Lastly, and not to be overlooked, are the long, narrow, thin-skinned, thin-walled peppers. Used for salads, sautéing, and grilling, they mature early and are prolific. We grow ‘Aruba’ or ‘Biscayne’, but many people favor the ‘Corno di Toro’, or bull’s horn.
Four beautiful bell peppers
 |
 |
 |
 |
Pepper practices to remember
• Pick an area of well-drained soil that can be freed up for the growing season, which lasts from spring to fall.
• Check the soil to ensure adequate phosphorus, potassium, and calcium for root and fruit development.
• To help prevent disease, separate transplants by 18 in. so they will have plenty of room for good air circulation as they grow.
• Pepper plants may need a nitrogen boost in mid-to-late July to keep bearing fruit to the finish line.
This article originally appeared in Kitchen Gardener #9 (June 1997).
Fine Gardening Recommended Products

Dramm Bypass Pruner, Cut up to 5/8-inch in diameter, Stainless Steel Blade, Blue
Fine Gardening receives a commission for items purchased through links on this site, including Amazon Associates and other affiliate advertising programs.

DeWit Spring Tine Cultivator
Fine Gardening receives a commission for items purchased through links on this site, including Amazon Associates and other affiliate advertising programs.

The Crevice Garden: How to make the perfect home for plants from rocky places
Fine Gardening receives a commission for items purchased through links on this site, including Amazon Associates and other affiliate advertising programs.


Comments
Log in or create an account to post a comment.
Sign up Log in