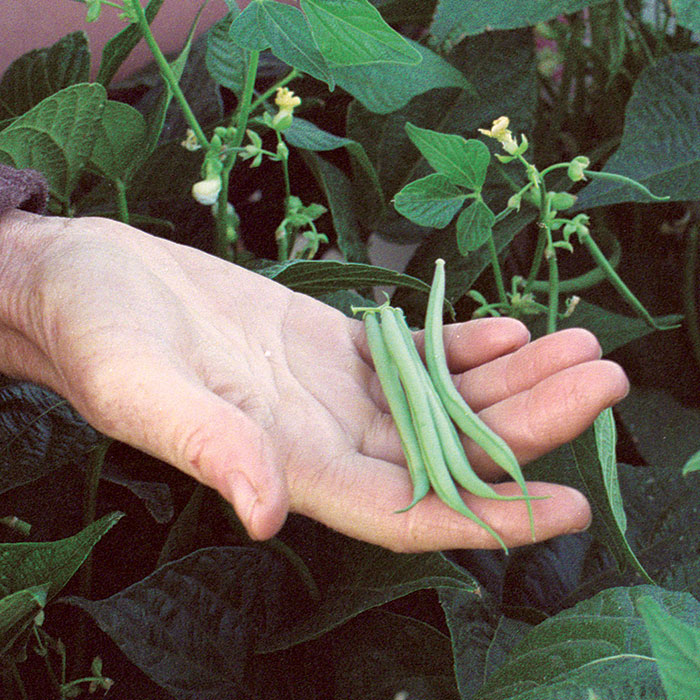
One day at the farmer’s market, a customer took one look at my filet beans and inquired whether I had grown the ones she had eaten the previous night at a local restaurant. I had. She proceeded to rave about how incredible the beans had been. To her, they were the most memorable part of the meal. Fancy that, green beans being the best part of a delicious meal at a fine restaurant. She bought a pound of beans and went home happy.
What is the allure of filet beans, also known as haricots verts? To me, it’s their tender, fresh sweetness, that essential green bean flavor condensed into one small package—green bean perfection. The chefs we sell to love them, because filet beans really add elegance to a dinner plate. And they are our favorite crop to grow.

Small-seeded varieties are more tender
We live and farm four miles north of Taos, New Mexico, at an elevation of 7,600 feet. Our average yearly rainfall is 12 inches. We have a four-month growing season and heavy winds in May and June. How can we grow good filet beans in such an extreme climate? The secret of our success lies in our choice of varieties. We have trialed numerous varieties of filet beans here at the farm. Our all-time favorite is ‘Finaud’. It is always the most tender and sweetest bean in our garden, and it bears bigger crops. When ‘Finaud’ was commercially unavailable for a couple of years, we replaced it with ‘Tavera’ and ‘Nickel’. Luckily, ‘Finaud’ is going to be back on the market this year. All three of these varieties are very small-seeded, and the smaller the seed, the more tender the bean.

There is another type or class of filet bean that has large seeds. I have trialed a number of these: ‘Vernandon’, ‘Fin des Bagnols’, ‘Triomphe de Farcy’, and ‘Emerite’, a pole-bean type that requires trellising or some kind of support. None has been satisfactory despite the glowing catalog descriptions. In our garden, they produce relatively few beans, which are usually large and tough, even when picked daily. I can’t recommend them, although I have wondered occasionally if these varieties would do better in a different climate.

Fertile soil and regular moisture are critical
As organic farmers, we invest a lot of effort on soil preparation. We add compost and minerals to our soil and grow cover crops. We have a heavy clay-loam soil, high in organic matter, with a neutral pH. For the home gardener, some well-cared-for soil with a light treatment of compost should provide filet beans with nearly all the nutrients they need.
We irrigate all our crops with drip tape, which we lay right beside each row of beans. During the growing season, we run daily cycles of water. The filet beans get 30 to 45 minutes per day, either in the evening or early morning. This keeps the soil moist but not soggy. You will need to adjust watering to suit your climate conditions.
A filet bean timetable
I wait for the weather to settle to plant filet beans. When the soil is warm enough to plant corn, 60°F, it’s also safe for beans. In cooler soils, filet beans germinate erratically, and the plantings lack vigor. They end up bearing about the same time as later plantings. But you don’t need a soil thermometer to know when to plant; when it feels safe to set out tomatoes, eggplants, and peppers, you can plant beans, too. I can usually sow a first crop by June 5. It will begin to yield about 50 days later, around July 25. I do a series of succession plantings, allowing 10 days to two weeks between plantings. Yields vary with weather conditions, but typically the first week of harvest is scanty, the second week is heavy, and the yield tapers off again the third week. After that we tear out the beans and plant a cover crop.
Filet beans tolerate no frost at all and tend to brown like basil at about 38°F. Keep this in mind when choosing dates for succession plantings. I recommend making your last planting 80 days before your last frost-free date. If you live where summers get very hot, consider planting filet beans in the spring or fall. You need 70 to 80 days of moderate temperatures—nights not below 40°F and daytime temperatures of 70° to 90°F. These are normal summertime temperatures here at our farm. Filet beans lose tenderness in hotter weather. Another commercial grower, 40 minutes to the south of us and in a hotter climate, finds she must pick her beans smaller to maintain tenderness.

How many beans should you plant at a time? One plant will yield about 1 ⁄ 2 pound of beans total. If I were planting just for our family of four, I would plan on having 5 to 10 plants per planting. To the first planting I would add three extra plants for seed saving, and in a second or third succession, I would sow a larger planting of 20 plants to make our favorite dill beans for wintertime snacking. Keep in mind that when they’re in season, we eat filet beans daily, so adjust your planting accordingly. I can only imagine how thrilled a neighbor or co-worker would be to receive any excess beans you might grow.
Growing beans to save for seed
Growing beans for seed saving is fairly easy. The main thing to bear in mind is that the smaller-seeded varieties are bred to hold on the plant without seeding up. You’ll have best success at harvesting seed if you sow a few extra plants with your first planting of filet beans and leave these to make seed. It takes another four to six weeks from the time beans are ready for eating until they’re ready to harvest for seed. I always mark the seed-saving plants with surveyor’s tape (photo at right) to keep them from being picked along with the eating beans.
Harvest the pods when they are brown and dry. The seed inside should be hard. Some varieties will shatter-meaning the pod will split
open to disperse the seeds-so keep an eye on your seeds’ progress and harvest accordingly.

If all the seed pods are not completely dry, leave them or a screen to dry in a well-ventilated location. I store my bean seeds, pod and all, in a paper bag labeled with the variety name, the original seed source, and the year. Then some winter night I shell out the seeds by hand and return the seeds to the paper bag to keep until summer. If you live in a humid climate, you might want to store the shelled-out seeds in a canning jar, with the lid screwed tight.
Bean seeds can keep their vigor for many years. Each winter, I sort through all my seeds-we save several kinds of seeds here at our farm-and make a list of everything I have. At this time I also do a germination check with any seed I am uncertain about, testing the seed’s viability. To do this, I put 20 seeds (or 10 seeds if my supply is low) on a very damp paper towel, roll it up, and seal it in a ziplock bag. I write the seed name and date on the bag and put it on top of the refrigerator for warmth. A week later, I check for sprouting seeds. Based on how many seeds sprout, I adjust my planting as needed, sowing more thickly, re-ordering new seed, or planting as usual, knowing the seed germinated well.
—M.B.
Inoculate for a better, healthier crop
Prior to planting, we inoculate bean seeds with nitrogen-fixing bacteria powder. This step allows the beans to produce nitrogen. When we pull up inoculated plants, either to clean up for a cover crop or to thin, we see nitrogen nodules on the roots. Now don’t get too excited about this, because the beans use about the same amount of nitrogen they produce. We don’t get a bean crop and a cover crop out of the filet bean. But I do see a hardier plant, and I think it’s worth the time to inoculate. All you need is a clean tin can holding all the beans you plan to plant in the next half hour, a sprinkle of inoculant, and a splash of water to make the inoculant stick to the beans. Give the can a shake and you’re ready to plant. If you don’t sow all the seeds you inoculate, let them dry out and store them for another planting.


I plant beans in shallow furrows cut open with the edge of a hoe. I space the seed 2 inches apart, then rake soil over the seeds, burying them 1 ⁄ 2 inch. The rows of beans are spaced 18 inches apart. The last step is to turn on the drip system and soak the soil thoroughly.
When the beans are showing their first true leaves, I quickly thin out half the plants, and weed the rows. We rely on a colinear hoe and a scuffle hoe to do most of our weeding work. I use the scuffle hoe most often because it’s quick; I can kill lots of weeds fast with it. The colinear hoe is better for more selective weeding, because you can get really close to a plant with this tool. It’s almost like hand weeding. Several weeks later, as the plants bush out, I go back over the rows, thinning to an 8-inch spacing between plants, and weeding a final time. Once the plants fill out, they shade out most weeds.

We have had no pest problems in the beans. One year I found a few Mexican bean beetle larvae (top photo, p. 13). Oddly enough, they were only on the ‘Emerite’ beans I was trialing that season. I hand-picked the larvae off and smashed them.
It is a good idea to limit handling of the plants or harvesting in rainy or damp weather because this can knock off blossoms and decrease your yield. In humid climates, where rust might be a problem, handling wet plants can also transmit rust disease. Recently we began feeding the plants just at blossom set with a foliar spray of kelp. We hoped this would encourage the plants to set fruit longer, but at this point we don’t have any proof of positive results from our experiment.

We harvest every other day, picking pods when they are 4 to 5 inches long. Filet beans do not keep well for long. You should eat them within four days of picking. If you need to store your harvest for a few days, soak the beans in cold water to remove any field heat, then drain them, and refrigerate in a plastic bag. But if you love these elegant, tender beans as much as we do, you won’t be storing them long.
Sources for bean seedsMost vegetable catalogs offer filet bean seed. The following sell varieties recommended by the author. The Cooks Garden Johnny’s Selected Seeds |
—Melinda Bateman and her husband, Bill Bockbrader Farm in Arroyo Seco, New Mexico.
—Ruth Lively is senior editor.
June 2001
Photos except where noted: Ruth Lively.
From Kitchen Gardening #33
Fine Gardening Recommended Products

Coco Bliss 650gm Bricks (5-Pack) - Organic Coco Coir
Fine Gardening receives a commission for items purchased through links on this site, including Amazon Associates and other affiliate advertising programs.

A.M. Leonard Deluxe Soil Knife & Leather Sheath Combo
Fine Gardening receives a commission for items purchased through links on this site, including Amazon Associates and other affiliate advertising programs.


Comments
Log in or create an account to post a comment.
Sign up Log in