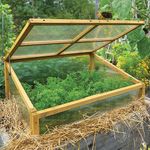
Easy-to-Build Cold Frame
This plan doesn’t require a lot of tools, a contractor’s license, or 500 trips to the hardware store

Experience has taught me that the simplest solution is often the best. I wanted to spend more time using my new cold frame than building it, so I designed a compact, easy-to-move, low-maintenance box with a special feature: a hydraulic riser. This heat-sensitive opener regulates the temperature in the cold frame so that I don’t have to check on my plants as often.
Learn more: Winter Herb Gardening: Easy Herbs to Grow in a Cold Frame
Cold frames are little solar greenhouses that provide a favorable environment for hardening off seedlings, growing cool-weather crops, and protecting tender plants. They don’t require outside energy; they, instead, collect and retain warmth when the sun’s rays penetrate the clear-plastic, glass, or fiberglass sash. The walls of the frame are most often constructed out of wood, but it’s not unusual to use concrete, stone, or even straw bales. There is no standard-size cold frame, so its dimensions will depend on the amount of your available space, how you plan to use the cold frame, and the size of your sash material; 3 to 4 feet is a convenient space to reach across.
I used a 72-inch-long and 36-inch-wide sheet of acrylic for my sash and clear 2×6 cedar for the structure. The cost of cedar is justified by aesthetics; plus, the wood is rot resistant, lightweight, and easy to work with. I attached the 2x6s to 2x2s in the corners, and the sash frame is made out of 1x2s.
Because this simple design requires only a few different lengths of wood, you might want to ask the folks at the lumber yard to make all your cuts to size, which they will often do for free or for a small fee. The only tricky cut to make—and the only one they won’t make for you at the lumber yard—is the one to create the triangle-shaped side boards, which are made from one 33-inch-long 2×6 cut on the diagonal.

Pick the right spot
The ideal location for a cold frame is a southern or southeastern exposure with a slight slope to ensure maximum solar absorption and good drainage. A sheltered spot with a wall or hedge to the north will provide protection against winter winds. Sinking the frame into the ground somewhat will also allow you to use the earth for insulation. Create a path to your cold frame and clear the plenty of space around it to maximize accessibility.
➔ 2x2s guide the sides

Screw two 71-inch-long boards into the butt end of two 31½-inch-long boards so that they make a shallow box. Attach the 2x2s in each corner to align the second and third layers and to fasten everything together.
➔ Let the lid shed water

To assemble the lid, clamp the acrylic sheet between the 1x2s. Use 1¼-inch-long deck screws spaced about every 12 inches to attach the layers together. Leaving off the bottom strip allows rain and snow to slide off rather than puddle on the surface. Along the front, use pan head screws to fasten the acrylic to the wood.
➔ An automatic opener is a finishing touch

After attaching the lid to the frame, it is time to add a solar vent opener (charleysgreenhouse.com), which relies on a wax-filled piston to open the cold-frame lid automatically on sunny days to prevent overheating.
Construction tip: Be careful with that drill
Pre-drill all screw holes to avoid splitting the wood or cracking the acrylic. Take care not to penetrate the other side of the material you are pre-drilling.
Rob Wotzak is a carpenter and a Web producer for FineHomebuilding.com and GreenBuildingAdvisor.com.
Photos: Kerry Ann Moore. Illustration: Rob Wotzak, colorized by Bill Godfrey.
Watch this video to learn more about how to build a cold frame.
Read about four great ways to use a cold frame here.
Fine Gardening Recommended Products

The Crevice Garden: How to make the perfect home for plants from rocky places
Fine Gardening receives a commission for items purchased through links on this site, including Amazon Associates and other affiliate advertising programs.

Gardener's Supply Company Summerweight Fabric Plant Cover
Fine Gardening receives a commission for items purchased through links on this site, including Amazon Associates and other affiliate advertising programs.

VegTrug Classic Cold Frame
Fine Gardening receives a commission for items purchased through links on this site, including Amazon Associates and other affiliate advertising programs.


Comments
Nicely detailed article with clear pictures for guidance.
Would have liked more info on how to integrate the solar opener since that is the main item that distinguishes your cold frame from the old fashioned kind. At least you gave the model number for more research.
Here's the product. Note: it says the cylinder should not be allowed to freeze.
https://www.charleysgreenhouse.com/index.cfm?page=_productdetails&productid=3515&s=solar%20vent%20opener&cid1=842&cid2=200&cid3=-99
Log in or create an account to post a comment.
Sign up Log in