Lattice Can Help Organize Your Veggie Garden
Learn how this inexpensive building material can improve the beauty and functionality of your space
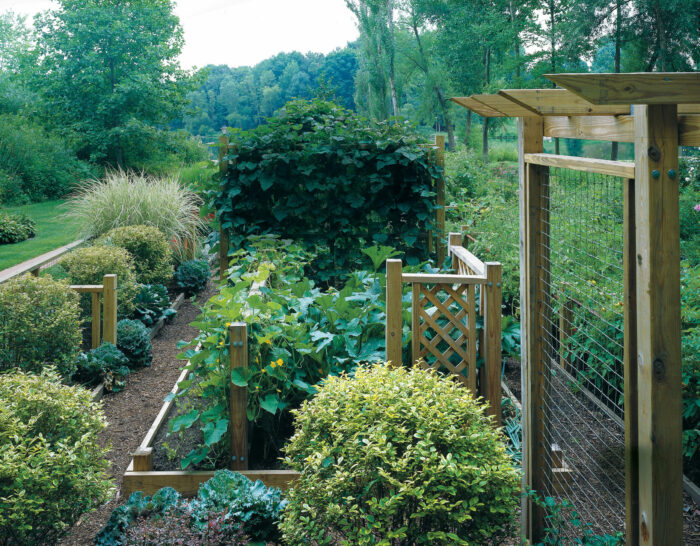
When we were building our house on a lakeshore in southwestern Michigan, it wasn’t immediately clear where we would put the vegetable garden. We realized the dense shade of the many tall oaks and hickory trees would prevent us from growing vegetables around the house. We knew of flowers and shrubs that would do well in the shade, but vegetables need sunshine. The builders suggested that we cut down some of the trees to make space for a garden, but we didn’t want to. The only solution was to create a series of raised beds at the bottom of our property by the lake, where sufficient sunlight reached the ground.
The only problem with the garden being so far from the house was that it was hard to defend against critters. Fences seemed like the best defense, but we wanted something that would be attractive, inexpensive, and functional. We soon decided that lattice was the perfect solution.
Use fences to develop the garden framework
With the location of our vegetable garden set, we had to decide what our garden would look like, and some of the local wildlife offered design assistance. We found that rabbits enjoyed nibbling many of the new green shoots that emerged, so we knew we would have to protect the garden from those intruders. We had also seen deer swim across the lake and run around our property. Not being anxious to share our vegetables with any animals, we bought some chicken wire, cut some posts, and put up a fence around the garden.
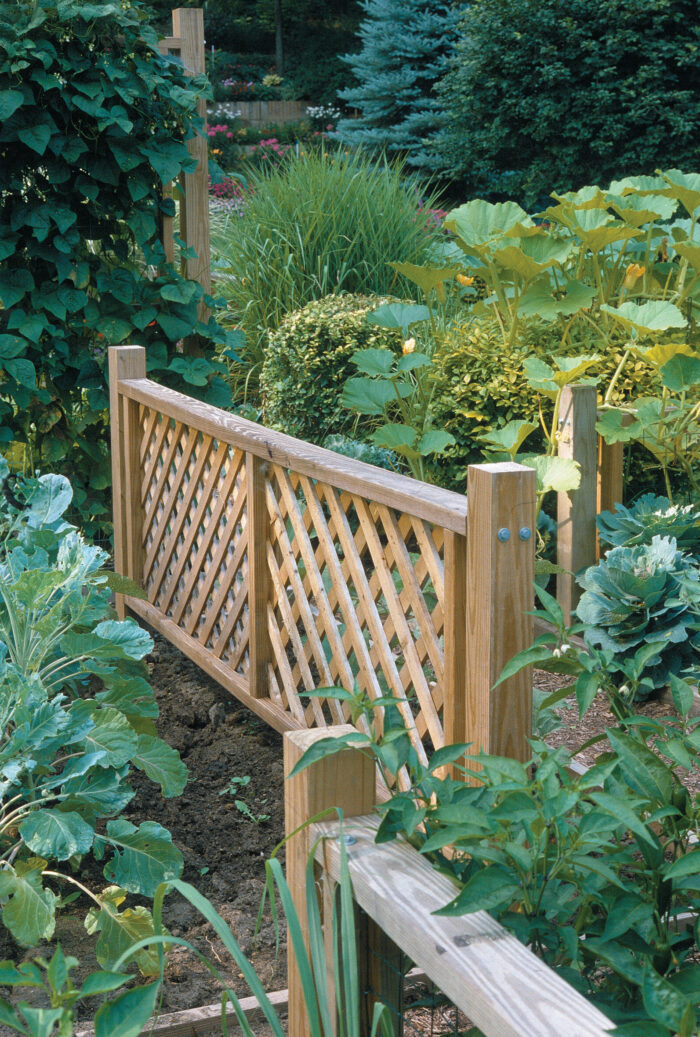
It served its purpose, but after a while, it started to rust (letting in unwanted visitors) and hardly reflected the joy and beauty of what is enclosed. Because we frequently have people visiting our flower garden, we wanted something that would complement its attractiveness. If we gave so much attention to the functional structures in our flower beds, why not do the same for the vegetable garden? So we took down the chicken wire and built a framed lattice fence in keeping with the trellises in our ornamental gardens. To this day, we still have not been troubled by furry intruders.
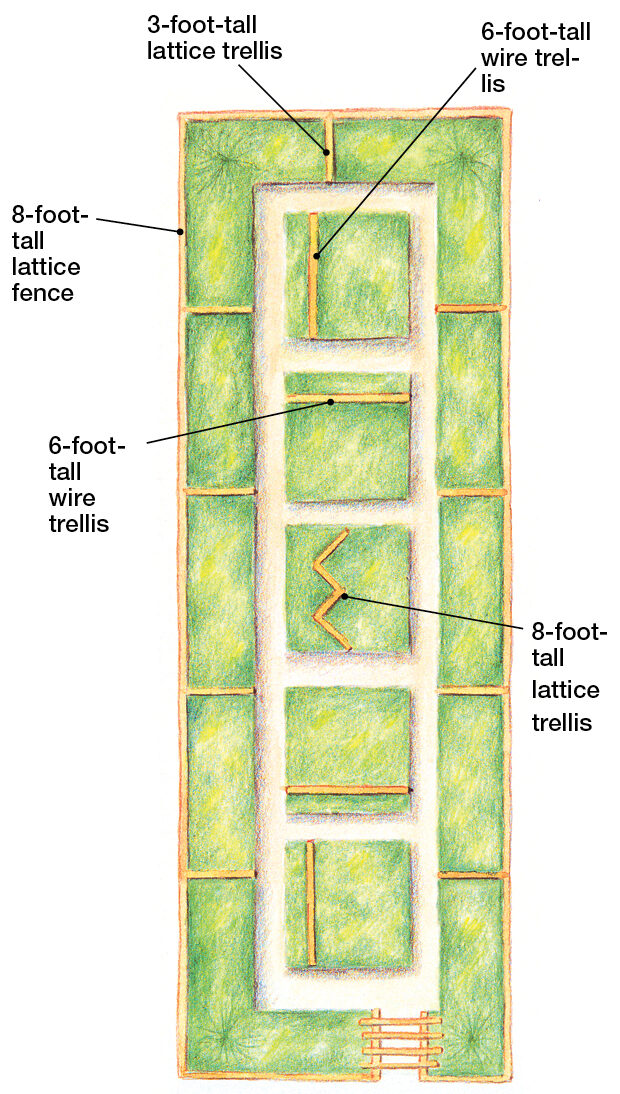
Our vegetable garden, which is 20 feet wide and 60 feet long, is completely enclosed by sections of lattice fencing. A series of 4-foot-wide rectangular beds form the border of the garden, while five 8-foot-square interior beds form the middle of the garden. Paths, which are 2 feet wide, provide easy access to every bed. Lattice trellises of varied heights and shapes—ranging from an 8-foot-tall W-shaped structure to a straight 3-foot-tall fence for climbing cucumbers—give the garden strong vertical elements and sturdy surfaces for plants to climb on. The overall layout makes it easy to cultivate, plant, weed, and harvest. The elevated structures also give symmetry to the garden.
Designate certain trellises for specific functions
We use lattice trellises in myriad ways within our garden. Trellises of various shapes and sizes support unruly climbing vegetables, such as beans, peas, cucumbers, squash, and pumpkins. We built these framed lattice supports using the same construction as the fence around the outside of the garden.
We grow squash on a W-shaped lattice trellis that is located in the center of the vegetable garden. This structure also provides an ideal focal point. On opposite sides of this are two 6-foot-tall trellises for beans that have the same type of framing construction but use wire instead of lattice. At the end of the season, we’ve found it’s easier to pull dead bean stalks off the wire than off the lattice. Even our tomatoes get a leg up, thanks to lattice trellising. Plants grow in the rectangular beds along the perimeter of the garden and are supported by the outside lattice fence. The beds are separated by framed lattice trellises that sit at right angles to the fence. These 3-foot-tall frames are scattered throughout the rectangular beds for supporting cucumbers, squash, and peas.
These trellis configurations help organize our garden. They also give us a sense of moving through a series of rooms as we walk around. We now have not only enough produced for our own needs but also enough produce to give to friends. In the end, mixing a little carpentry with horticulture has resulted in a beautiful and productive garden.
 An easy and versatile way to frame lattice
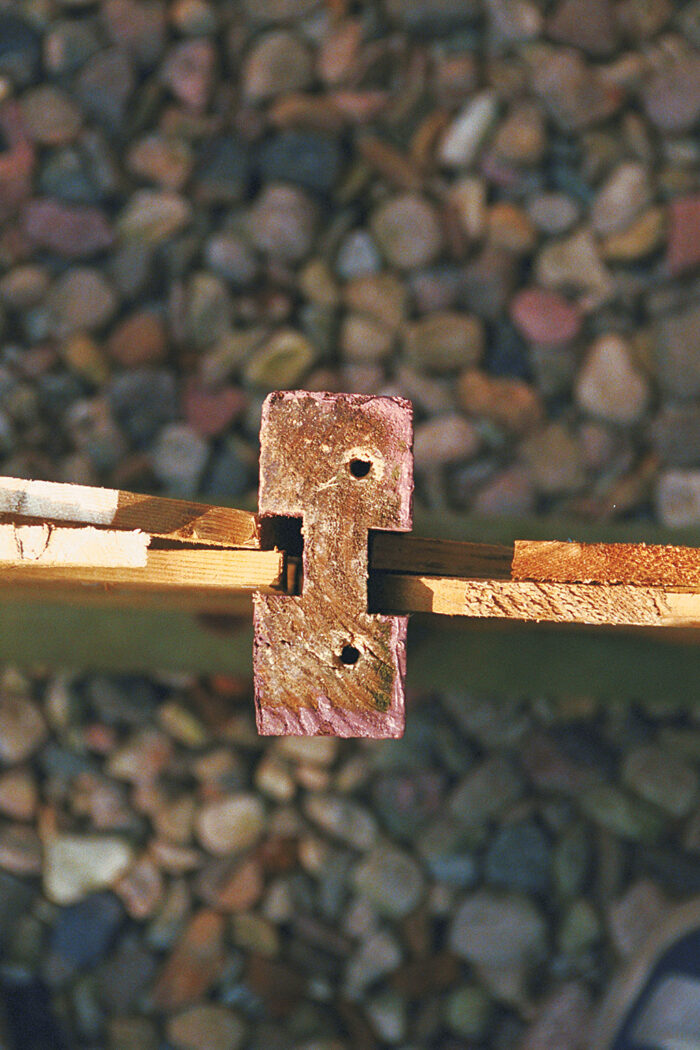
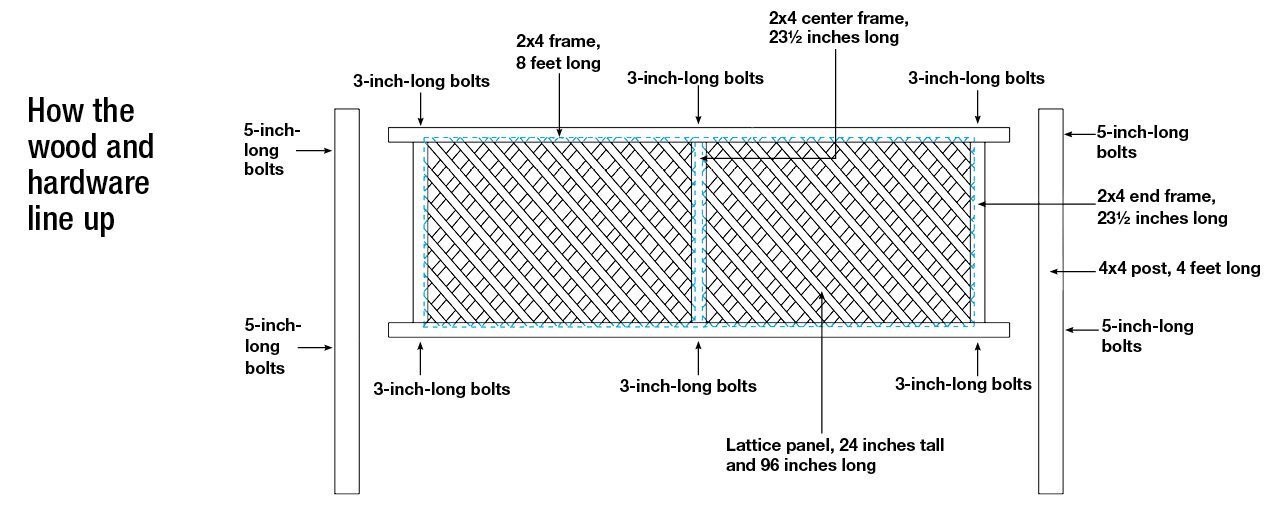
In designing our trellises and fences, we could have simply nailed lattice sheets to 2×4 upright posts. But we didn’t. We wanted something that would be attractive, sturdy, and versatile without being too complicated. By adding a few steps to that basic idea, we got what we wanted. Each trellis or section of a fence consists of a frame of 2x4s with grooves that allow us to slide in prefabricated lattice cut to size (photo right). We then attach the frames to 4×4 posts, and they’re ready for the garden. We use pressure-treated southern pine, but redwood, cedar, fir, and cypress are durable alternatives, though probably more expensive. The sections are easy to configure in various shapes and heights.
▶ The key element in making the frames is routing a groove about 5/8 inch wide and 1/4 inch deep on the inside surface of the 2x4s (photo below). This groove, easily cut using a dado blade on a table saw, makes it possible to insert lattice or wire mesh of various sizes into the frames, which gives the trellises rigidity and strength. If you use wire, you will need to staple it in place.
▶ The vertical pieces of the frames should be shorter by ½ inches than the width of the lattice sheet so that the lattice will fit inside cleanly and easily when the grooved horizontal pieces are put on. For a 2-foot-tall frame, for example, you would have a vertical piece of 23½ inches. Also, the horizontal pieces should project about 2 inches beyond the vertical ones to give a space between the 2×4 and the 4×4 posts when bolted together.
▶ Predrill holes to fasten the frames, whether you use bolts or screws. When attaching the frames to the 4×4 posts, there should be 18 to 24 inches of the post available to sink into the ground. That depth has been sufficient to prevent frost heave but considers your own conditions. When making sections that are 8 to 12 feet long, it’s a good idea to have an upright in the center for support. These uprights need to be routed on both sides to accommodate the lattice or wire.
Supplies and tools needed
• Lumber: 2x4s and 4x4s
• Lattice sheets and/or wire mesh
• Table saw with a 9-inch-diameter blade for cutting timber; dado blades for routing grooves
• Bolts: 3-inch-long by ¼-inch-diameter bolts for the frame (hexagonal lag bolts are best); 5-inch-long by ¼-inch-diameter bolts to fasten the 2×4 frame to the 4×4 upright posts
• Washers to use with the bolts
• Drill and bits
• Rasp for smoothing the 4×4 post tops to give them a finished look
• Hammer and ½-inch-diameter ratchet for installing bolts
Fine Gardening Recommended Products

Fiskars 28" Power-Lever Garden Bypass Lopper and Tree Trimmer
Fine Gardening receives a commission for items purchased through links on this site, including Amazon Associates and other affiliate advertising programs.

Coco Bliss 650gm Bricks (5-Pack) - Organic Coco Coir
Fine Gardening receives a commission for items purchased through links on this site, including Amazon Associates and other affiliate advertising programs.
VegTrug Classic Cold Frame
Fine Gardening receives a commission for items purchased through links on this site, including Amazon Associates and other affiliate advertising programs.


Comments
Log in or create an account to post a comment.
Sign up Log in