

Follow These Steps to Grow the Best Sweet Raspberries
Pruning and trellising keep canes vigorous and make harvesting easy

My fondest memory of childhood summers is picking red raspberries from my family’s small patch. The wonderful flavor and fragrance of these berries led me up and down the rows until I reached my saturation point. Now that I’m an adult, my own garden holds a prominent place for raspberries. In fact, for 10 years I grew raspberries commercially and sold them to area restaurants.
In the wild, you can find raspberries growing at forest edges and openings from Canada all the way south to the Appalachians. The red raspberries I remember from my youth, however, are crosses between this native American species and larger-fruited European species. These hybrids do take a bit of care to grow. You want to be sure to buy virus-free stock, plant it in well-amended soil, set up a trellis to keep the canes in line, and prune regularly. But when you top a cake with dark red berries or spread some raspberry jam on your morning toast, I think you’ll agree that the effort is worth it.
Raspberry Basics
|
1. Choose the right variety
Hybrid raspberries fall into two basic groups—those that produce fruit in midsummer on one-year-old canes (summer bearing) and those that produce fruit later in the season on first-year growth (everbearing). The summer-bearing varieties produce new growth at the same time that they bear fruit on last year’s canes. The new shoots, or primocanes, develop only leaves. By the following spring, these canes leaf out and produce an abundance of small white flowers. When pollinated, the flowers quickly become berries.


Everbearing raspberries have a slightly different schedule. They produce flowers and then fruit on the mature tips of first-year growth, starting in late summer and ending with fall frost. Everbearing plants typically produce a small summer crop, followed by a larger fall crop; like many growers, however, I prune them to produce only a fall crop. Many people refer to everbearers as fall-bearing raspberries.
When I began my commercial operation, I planted ‘Canby’, which produces large, light red berries with a delicate taste that was a favorite of my customers. ‘Canby’ has thick, thornless canes; is resistant to mosaic virus; and is not bothered by aphids. It isn’t reliably hardy in my Zone 4 garden, however, where winter temperatures can drop to –30°F. Still, I had five years of good production before my plants started to deteriorate.
My experience with ‘Canby’ taught me that no matter how a variety tastes, I have to pay attention to its range of adaptability. Certain varieties are better adapted to temperature extremes, soil types, rainfall, and diseases that occur in different regions. There are cultivars that will flourish in locations from Zones 3 to 10. To find out which varieties are suitable for your location, call your local extension service office or check with nurseries.
My favorite raspberry is ‘Taylor’, a medium-size, bright red berry that has excellent taste. In my garden, a year of high yield is always followed by one of moderate yield. But the superior taste of this berry more than compensates for its uneven bounty. For fall harvest, I like the everbearing ‘Heritage’. The dark red berry is high yielding with excellent flavor. I also like the golden variety ‘Sun Haven’, which is exceptionally sweet. This variety is a thick grower and more sprawling than upright, so it particularly benefits from the support of a trellis.
2. Prepare the soil for spring planting
I prefer to plant one-year-old bareroot plants because they are less costly than potted plants and because nurseries usually offer more varieties in this form. Make sure the nursery stock you purchase is certified as virus-free. Plants infected with viruses won’t live as long, and they often produce small, crumbly berries. To judge how many plants to buy, figure on setting plants 3 feet apart in the row. They’ll eventually fill in the row with canes. When that happens, every foot of row will produce about 1 quart of berries. Yields vary depending on variety and growing conditions, but this estimate holds true overall.

Throughout most of the country, raspberries should be planted in spring. But the best time to prepare the soil is in fall. This gives the soil amendments a chance to mellow, and it ensures that when the plants arrive in spring, you can get them in the ground right away. The ideal soil for raspberries is well-drained, loamy soil supplemented with lots of organic matter. I spread a 3-inch-thick layer of compost, rotted manure, or decayed leaves over the soil, then dig it into the top 12 inches. I work the ground this way in an area 3 to 4 feet wide for the length of a row. Although raspberries need quite a bit of moisture during berry growth (at least 1 inch per week), they don’t do well where soil stay waterlogged.
Raspberries should be planted the following spring when the ground is workable, as early as a couple of weeks before the last frost. Just before planting, I give the bareroot plants a boost by soaking them in a weak solution of 1 gallon of water and 1 ounce of liquid seaweed fertilizer. I let the plants soak for one to six hours.

While the plants are having their bath, I dig holes 1 foot wide and deep enough to set the plants 2 inches lower than they were in the nursery. (A line of dried soil on the stem will indicate the original depth.) I build a small cone-shaped hill in the middle, set the plant on top, and drape the roots evenly over the hill. I cover the roots completely with soil, and pushing down with my outstretched hands, I lightly compact the soil around the cane. Each plant then gets about a quart of water. Compacting and watering settles the soil, so I fill the hole again to the surface of the surrounding ground. Then I cut the cane back to a 4-inch-long stub, and planting is complete.
An organic mulch keeps the soil moist and cool and just about eliminates weeds. I use a layer of straw or leaves. To make irrigation easy, I run porous rubber soaker hose the length of the planting. When it doesn’t rain for a week, I turn on the soaker hose for a few hours. If you’re uncertain about whether to water, poke around the top few inches of soil with your finger. If it doesn’t feel moist, irrigate. When the plants are established and start to blossom, I feed them again with liquid seaweed fertilizer.
3. Do not skip pruning
To keep brambles from becoming an impenetrable thicket, you need to prune. Summer-fruiting raspberries are pruned twice a year. In early spring, after the coldest weather has passed, I cut the canes back to 5 feet tall because the greatest production of berries occurs on buds that form 1 to 5 feet up on the cane. At this time, I also remove weak or damaged canes, cutting them right to the ground. I leave eight to 10 canes per plant and completely remove the rest. The second pruning occurs just after harvest. I cut out the old brown canes that produced fruit as close to the ground as possible. I bag them up and send them out with the trash; you don’t want to add raspberry prunings to the compost pile because they could harbor disease.

Everbearing varieties can be pruned just like summer-bearing ones if you want to have a small crop during summer and another in fall. Most everbearers will produce a more abundant fall crop, though, if they are treated like annuals and cut back every fall. Mow the canes to the ground after the leaves have fallen off, which is your signal that the plants are dormant. If you mow too early, you could stimulate new growth that would die in winter and weaken the plant. The following spring, new shoots will grow into fruit-bearing canes.
Raspberries are attacked by their share of insects and diseases, which I keep under control by using preventive measures. Buying virus-free stock and using varieties that are unappealing to disease-spreading aphids add years of productivity. To prevent verticillium wilt, avoid planting raspberries in locations where tomatoes, potatoes, or peppers have grown. Timely spring and fall pruning helps prevent fungal diseases.
Birds damage only a small part of my planting, so we maintain a live-and-let-live relationship. Where birds have more voracious appetites, friends of mine cover their raspberries with row covers when ripening time nears. The fabric is light enough to be lifted by the growing plants, but the canes don’t become entangled in it, as they do with bird netting. If the fabric threatens to sail away in a wind, clip it to the trellis wires with clothespins.
When the berries are still firm but separate easily from the plant, it’s time to harvest. Ripe berries go by quickly, so they should be picked at least every day or two. I put the berries into pint containers so that the berries are not crushed. Wet berries are prone to rot, so I gather them when they’re dry and I don’t wash them. Those that make it into the house (rather than into my mouth) go right into the refrigerator unless I’m going to eat them within a few hours. Those I don’t eat within a day or two after picking I freeze. If you’re lucky, there might be enough in the freezer or in jam to get you through until the next harvest.
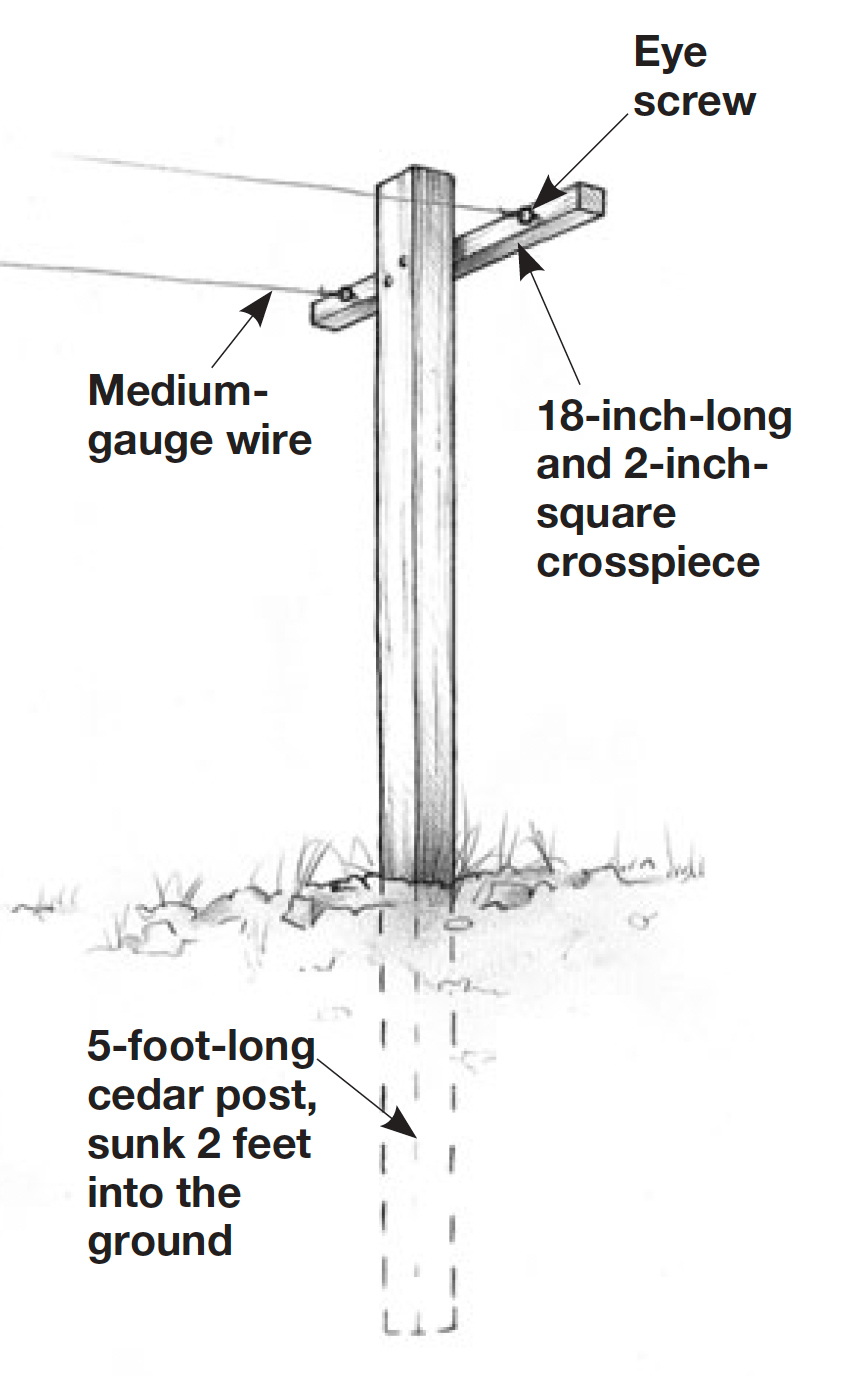
Extra Tip: Trellis for Easy Picking
To make harvesting easy, I confine the canes to a neat row by building a 3-foot-tall T-bar trellis system. Constructing the trellis is a simple matter of sinking posts, attaching crosspieces, and stringing wire. If suckers grow outside the trellis area, just mow them down or dig them out. This keeps the planting tidy, allows air to move freely, and holds disease at a standstill.
STEPS
1. Sink a 5-foot-long cedar post 2 feet into the ground at both ends of the row.
2. Screw an 18-inch-long and 2-inch-square crosspiece to the top of each post.
3. Screw in an eye screw 3 inches from each end of the crosspiece on both posts.
4. Run two strands of medium-gauge wire between the posts, and attach them tautly to the eye screws.
Jay Leshinsky grows his favorite raspberries in Vermont.
Photos, except where noted: Boyd Hagen
Fine Gardening Recommended Products
A.M. Leonard Deluxe Soil Knife & Leather Sheath Combo
Fine Gardening receives a commission for items purchased through links on this site, including Amazon Associates and other affiliate advertising programs.

Lee Valley Mini Garden Shear Set
Fine Gardening receives a commission for items purchased through links on this site, including Amazon Associates and other affiliate advertising programs.
Berry & Bird Rabbiting Spade, Trenching Shovel
Fine Gardening receives a commission for items purchased through links on this site, including Amazon Associates and other affiliate advertising programs.


Comments
Log in or create an account to post a comment.
Sign up Log in